Renee's Kitchen Adventures: January 2011

Monday, January 31, 2011

Jiffy Corn Dog Mini Muffins

Jiffy Corn Dog Mini Muffins is a super simple appetizer or kid friendly entree using Jiffy Corn Muffin mix and turkey hot dogs.

I am not much of a football fan...but I am a fan of appetizers.  I know many people will be attending parties or having parties of their own own this upcoming weekend and are probably in search of some tasty appetizers and dishes to serve or bring that won't leave you feeling guilty or deprived.
 
I made these easy Jiffy Corn Dog Mini Muffins for my boys yesterday, and they gave them a thumbs up.  Serve them warm or at room temp with some ketchup and/or mustard for dip.  I used Oscar Mayer Turkey hot dogs and Jiffy corn muffin mix, so that is what the nutrition information is based on. 


Jiffy Corn Dog Mini Muffins

Servings - approx 20 mini muffins   Servings size - 1 mini muffin   Points plus per svg - 2 points+
Calories - 79,   Total Fat - 3.2g,   Carb. - 11.3g,   Protein - 2.1g,   Fiber - 0g

Ingredients:

1-8.5 oz. box of Jiffy Corn Muffin Mix
1 egg, slightly beaten
1/3 cup skim milk
1 TBSP honey (optional)
4 Oscar Mayer Turkey Hot dogs, each cut into 5 pieces 

Directions:

1. Spray the wells of a mini muffin pan with cooking spray.  Preheat oven to 400 degrees F. 
2.  In a med bowl, combine the mix, egg, honey and skim milk.  Allow to sit for 3 - 4 min.  Stir batter.  
3.  Fill each mini muffin well with about 1/2 TBSP batter.  Place a piece of hot dog into each well, pressing in.  
4. Top each hot dog with about a tsp. of batter, covering hot dog.  
5.  Bake in oven for 10 - 15 min.  or until golden brown.  Allow to cool in pan for 5 min. before removing to platter. 


Thursday, January 27, 2011

Apricot Cranberry Couscous

Couscous is the perfect side dish for a busy weekday.  It takes minutes to prepare from start to finish.  I was inspired by the Goodhousekeeping's cookbook Grains!, to come up with the flavor combination for this dish.  I am also entering it in this week's BSI (Blogger Secret Ingredient).  Each week a new host picks an ingredient and anyone (food blogger or not) can submit a recipe.  This week's host is Dana @ Foodforthought and this week's ingredient is....you guessed it...couscous!  For more on BSI, go here.

Like any couscous dish, this is simple to prepare.  I think it would be best served with some kind of poultry because of it's slight sweet nature.  I liked the crunch of the pistachios added at the end.


Apricot Cranberry Couscous adapted from Grains!

Servings - 6   Serving size - approx. 1/3 cup   Points plus per svg - 5 points+
Calories - 187.8,   Total Fat - 3.3g,   Carb. - 34.9g,  Protein - 5.3g,  Fiber - 3.1g

1 tsp. olive oil
1 small onion, chopped
1 cup low sodium, fat free chicken stock
1/4 cup orange juice
1/2 tsp salt
6 dried apricots, cut into strips
 1/4 cup dried cranberries
1 cup whole wheat couscous
1/4 cup salted and shelled pistachios, chopped

1.  Heat 2 quart saucepan over med heat.  Add olive oil and onions.  Cook until softened, about 5 minutes.  
2.  Add chicken stock, orange juice, salt, apricots, and cranberries to pan.  Let come to boil.  Turn heat down, and simmer for 2 minutes.  
3.  Turn off heat, and add couscous.  Cover and let sit for 5 minutes.  
4.  After 5 minutes, add pistachios and mix with fork, fluffing up couscous as you mix. 

PRINTABLE RECIPE

Don't forget to check back tomorrow.  I will unveil a product I have been testing and offer you a chance to try it for yourself.  

Wednesday, January 26, 2011

Pizza Party!

Last week, I decided to make pizza for dinner.  Now while most people I know just adore pizza, I think it's just ok...unless I have a craving...then I think it's terrific.  I happened to be craving it last week.  I had flour and yeast, canned tomatoes and plenty of fresh vegetables for toppings and I had low fat mozzarella cheese and a few other cheeses in the fridge...so I was all set.  I needed to make the dough from scratch and the sauce from scratch, which done in one day, is a bit of an undertaking...but if you plan right, you can make the dough and sauce ahead of time, leaving the pizza prep for the night you plan to make it.

I made a wonderful sauce that worked out to 1 points+ per 1/2 cup serving.  I divided it up in half, and pureed half  with my immersion blender for the "pizza" sauce and left the other half "chunky" to top pasta or spaghetti squash on another day.  The recipe yields about 2 quarts of sauce.  If you can, use no added salt tomatoes to keep the sodium content in check.

Once it's been pureed into a smooth sauce for pizza

Smooth sauce and chunky sauce
Basic Tomato Sauce Two Ways

Servings - approx 2 quarts   Serving size - 1/2 cup   Points plus per svg - 1 point+
Calories - 41,   Total Fat - 1g,   Carb. - 7g   Protein - 1g,   Fiber - 1g

1 TBS olive oil
2 sweet onions, chopped
4 cloves garlic, peeled and diced 
1 (28 oz. ) can of diced tomatoes 
1 (28 oz.) can of crushed tomatoes
2 TBS tomato paste
1 1/2 tsp. dried oregeno
1/4 tsp dried red pepper flakes
1 tsp granulated sugar
1 tsp salt
1/2 tsp pepper

1.  Heat oil in dutch oven or large stock pan over med high heat.  Add onions and garlic and stir.  Cook until softened and fragrant, about 5 -6 min.  

2.  Add remaining ingredients, and allow to come to a boil.  Turn heat down to allow sauce to simmer.  Partially cover and allow to simmer for about an hour, stirring occasionally. 

3.  Taste and adjust salt and pepper to your liking. 

4. Divide the sauce in half.  Leave one half chunky for pasta and use an immersion blender ( or blender or food processor) to puree up other half for a smooth sauce for pizza.  This sauce freezes very well.


Pizza made using homemade sauce, turkey sausage, peppers, mushrooms and cheese.  6 pp per 1/6th of pizza.

Mmmmmm....cheesy.

Spinach, onion, turkey bacon and smoked gouda cheese.  No sauce, just a spritz of olive oil from the misto.  

Easy Pizza Dough adapted from WW New Complete Cookbook

Servings - 12 ( 2- 12" pizza crusts cut into 6 pcs)   Serving size - 1/12th of recipe   Points plus per svg - 3 points +*
Calories - 102,   Total Fat - 1g,   Carb.- 20g   Protein - 3g,   Fiber -1g

3/4 cup warm water ( about 100 - 105 degrees F)
1 tsp. active dry yeast
1/2 tsp sugar
2 tsp olive oil
2 1/2 cups all purpose flour*
1/4 tsp salt

1.  In a 2 cup glass measure, combine the warm water, yeast and sugar.  ( the water should feel luke warm to touch, but not hot)  Set aside and allow yeast to get happy.  ( about 5 min)   Add the oil and mix.

2.  In food processor, with dough blade in position if you have it, combine the flour and the salt.  Pulse a couple of times to combine.  With food processor running, pour a stream of the water mixture through the shoot into the flour, until the dough comes together. (It should be soft but formed into a ball.  If its not formed add more water, if its too sticky, add more flour, until you get the right consistency.  Flour will absorb different amounts of water depending on the amount of humidity in the air.)   Continue to run food processor for about 3 minutes to "knead" dough.  If you aren't using a dough blade, remove dough and knead by hand until smooth and elastic.  

3.  Put dough in bowl sprayed with oil or cooking spray and cover.  Allow to rise for until about doubled.  About an hour or so.  ( again, will depend on the temperature of your home)

4.  Once dough has risen to about doubled it original size, punch down and divide into two equal pieces.  ( I weigh mine to get them as even as possible).  Allow dough to "rest" , covered, for about 10 minutes before forming into pizza crust...this allows the dough to be stretched a little easier.  This recipe makes TWO 12" pizza crusts.  ( you can freeze one half  for up to 6 months, defrost in refrigerator, or refrigerate it for up to 1 day in a ziplock bag)  

*You could make this dough with whole wheat white flour for one less point+ per serving.  I didn't have any, so I just used all purpose flour. 


Tuesday, January 25, 2011

Easy Cheesy Pasta Bowl for One

I have to credit this recipe to a fellow blogger, Erica, from Fashion Meets Food.  The other day she created a "healthy" mac and cheese that was...well...sheer genius.  She took a box of Green Giant Cauliflower and Cheese Sauce and mixed it with pasta.  Wow!  So easy....and cheesy!  So yesterday for lunch, I took her lead, and nuked up a box of Green Giant Cauliflower and Cheese Sauce ( the entire box is worth 4 points+), had a bit of pasta left over in the refrigerator, so I measured out 2 oz ( roughly 2.5 points+), which would amount to one ounce dry,  ( see the Great Pasta Question for reference) and nuked up some frozen broccoli (0 points+).  Mixed it all together and wow....what a great meal for 6.5 points+!!  If you opt for whole wheat pasta, you could save another point off the total.  I finished off my meal with a couple of clementines ( 0 points+) for an extremely satisfying and comforting lunch!  I love this because you not only get to have mac and cheese, but you also get several servings of vegetables in one bowl.  The only thing I added to the mix was some fresh ground pepper from my pepper mill.  If you wanted to make this for more than one, just adjust the ingredients to fit the number of servings you would like to have.  You could also divide the servings and serve this as a side dish for half the points per serving ( so one recipe would make two side dishes).


Easy Cheesy Pasta Bowl for One as seen on Fashion Meets Food

Servings - one   serving size - entire recipe   Points plus per svg - 6.5 points+

1 (10 oz) box of frozen  Green Giant Cauliflower and Cheese Sauce
1 oz. (dry) pasta ( I used cavatappi)
1 cup broccoli florets, cooked
fresh ground pepper, to taste

Cook the Cauliflower and Cheese according to package directions.  Cook the pasta according to package directions.  Mix cauliflower and cheese, cooked pasta, and broccoli together.  Add pepper to taste.

Sunday, January 23, 2011

Raspberry "Zinger" Cake

A blast from my past.  A cake that is reminiscent of  a Dolly Madison zinger.  You know, the one with the spongy cake, creamy filling, and  wet raspberry coating all covered in coconut. This cake is soft and moist with ripples of raspberry flavor topped with a creamy "frosting" and shredded coconut.  The original recipe ( I am not even sure who originally came up with this one, so I can't give credit) called for diet soda, which you could use if you choose, but I decided not to add more sweetness to the cake with more artificial sweetener and opted to use club soda, which worked out beautifully.  Cut into 16 servings, each piece comes in at 4 points+ each. With Valentines Day coming up next month, wouldn't this be a really pretty cake to bake to celebrate? 


Raspberry "Zinger" Cake 

Servings - 16   Serving size - 1/16th of cake   Points Plus per svg - 4 points+
Calories - 162.6,   Total Fat - 3.5g,   Carb. - 29.8g   Protein - 2.2g,   Fiber - 0.3g

1 package of white cake mix ( the kind WITHOUT the pudding in the mix)
1 + 1/4 cup club soda or sparkling water
2 egg whites
1 small package of sugar free raspberry flavored gelatin
1 + 1/2 cups hot water
2 cups Cool Whip FREE
1/4 cup shredded, sweetened coconut

1.  In large mixing bowl, combine the cake mix, club soda and egg whites.  Mix well and bake according to package directions in a 9 x 13" glass baking dish which has been coated with cooking spray. 

2.  Once cake is done, cool slightly, about 15 minutes.  Combine the hot water and the gelatin.  Stir to dissolve gelatin completely.  Poke holes in cake with tines of fork at intervals of about a 1/4 of an inch apart.

3.  Pour gelatin mixture over the entire cake.  Put in refrigerator, and allow to set for 3 hours.  

4.  Frost the cake with cool whip free.  Sprinkle with coconut. Store, covered, in refrigerator. 

Thursday, January 20, 2011

Tilapia Piccata

A twist on the traditional chicken piccata, tilapia piccata is just as delicious.  I like to use tilapia loins when I cook tilapia.  They are thicker than the fillets and a little easier to work with, but the recipe works fine with the fillets too, if you can't find the loins.  If you have never tried tilapia before, it is a very mild white fish.  The use of the shallots and capers is optional.  Shallots taste like mild, sweet onions. 


Tilapia Piccata
Servings - 4   Servings size - 3-4oz. cooked fish with about 2 TBS sauce   Points Plus per serving - 6 points+
Calories - 215,   Total Fat - 10.3g,   Carb. - 7.5g,   Protein - 23.8g,  Fiber - 0.4g

1/4 cup all purpose flour
1/2 tsp. salt
1/4 tsp. fresh ground pepper
1/4 tsp paprika
approx. 1 pound of tilapia, either fillets or loins
1 1/2 TBS. canola oil
1/4 cup shallot, minced ( optional)
1 cup low sodium, fat free chicken stock
1 tsp. cornstarch
juice of half a lemon
1 TBS unsalted buter
2 TBS chopped, fresh parsley
2 TBS capers, drained ( optional)

1.  Combine flour, salt, pepper and paprika in a pie plate or other shallow dish.  Dredge each piece of fish in flour mixture to coat and shake off excess.  

2.  Heat large nonstick skillet on med high heat.  Add the canola oil.  When whisps appear in oil, add fish.    Brown each side for about two minutes. Don't overcrowd pan...brown in batches if needed.  Remove fish to warm oven ( 200 - 250 degrees F)  while making sauce.  The fish doesn't need to be cooked all the way through, as it will finish cooking while sitting in the warm oven.  ( I like to put mine in a 9 x 13" glass baking dish and pour the sauce over all the fish when its ready)

3.  In same pan fish cooked in, add the shallots and cook for about 2 minutes, or until soft.  Add in stock and let come to boil.   Let the stock boil and reduce by half.  Dissolve cornstarch in about a TBS of water.  Whisk into the stock and allow to thicken for one minute.  Turn off heat,  add the lemon juice and swirl in the butter.  Add the parsley and capers.  Pour sauce over the warm fish. 


Wednesday, January 19, 2011

Banana "Ice Cream" ( Zero P+)

Variations of this recipe have been popping up all over the internet lately, probably because now that fruit is considered a zero point food on point plus, Banana "ice cream" is now a zero point treat.  I first saw this recipe a few month ago on Danica's Daily.  Since then I have seen variations posted on several blogs and recipe sites. Everybody knows bananas are good for you.  They contain moderate amounts of vitamin B6, vitamin C, manganese and potassium.

I was skeptical at first, but soon found out banana "ice cream" is super easy to make and really does whip into a mixture with a similar texture to ice cream.  You WILL need a food processor to make this, either a full sized one or a mini one.  ( I use my mini one for one banana...which is one serving)  It's very versatile...you can use any liquid of choice...ff creamer, skim milk, almond milk, soy milk....and you can add any flavor enhancer to it you like...vanilla extract, cinnamon, coconut extract...the possibilities are almost endless.    You will want to start with a very ripe banana.  Peel it, slice it up, and freeze it.  ( perfect for those bananas that get a little over ripe) You must slice the banana before it goes into the food processor, or your food processor motor will not be happy. I have been slicing up my over ripe bananas, and then putting the slices from one banana into freezer bags and popping them into the freezer for when I want a treat. 

*Please note, this is one of those recipes that fall into the "gray area" of point plus calculations.  For all intents and purposes, this is a zero point food...however, when the nutrition information is used to calculate points plus, you will get 4 pp per serving..this is also true of the recipe builder tool on WW.  With a recipe that falls into this category, I have been told by WW, that you can consider this a zero point food, if you are happy with your weight loss...if you are not seeing results, then you should consider counting it as 4 points+ per serving. 


Banana "Ice Cream" ( Zero P+) adapted from Danica's Daily

Servings - one   Serving size - one banana   Points Plus per svg - zero or 4 points+ * ( see explanation above)
Calories - 135.8,  Total Fat - 0.8g,   Carb. - 33.4g,   Protein - 2.4g,  Fiber - 3.2g

1 med to large very ripe banana, sliced and frozen
2 - 3 TBS skim milk
1/4 tsp. pure vanilla extract

1.  Put frozen sliced banana into the food processor.  Start with 1 TBS milk and pulse...scrap down sides and add more milk and process until you get a "soft serve" ice cream consistency.  
2. Add the extract and pulse for a second more. 

I topped mine with a few mini chocolate chips ( may affect point plus value).  A really delicious, satisfying treat anytime!  


Tuesday, January 18, 2011

Mustard Roasted Potatoes

This is a favorite recipe of mine that can be found on WW online.  It's just a few simple ingredients mixed together, but they give the roasted potatoes a mighty punch.  It's a perfect side dish for any type of meat.  Last night, we had these with BBQ chicken and they were a nice accompaniment.  The original recipe calls for plain dijon mustard, but I found I liked the flavor of a bolder mustard, one that you can see the grains of mustard seed in it and has a bit of horseradish added.  Grey Poupon has a deli mustard that works very well in this recipe.  I also like to use Dutch Yellow baby potatoes, but any new potato, red or white, will work.  The Dutch Yellow babies have a rich, buttery flavor with a tender skin.  A very generous portion ( approx. 1 1/4 cups) comes in at 4 points+.


Mustard Roasted Potatoes adapted from WW online

Servings - 4   Serving size - approx. 1 1/4c   Points Plus per svg. - 4 points+
Calories - 171.8,   Total Fat - 2.4g,   Carb. - 32.8g,   Protein - 3.8g,   Fiber - 4.1g

1.5 pounds new potatoes, red or white, quartered or halved ( leaving the tiny ones whole is fine too, you want to have them all about the same size)
2 TBS deli mustard ( one with the grains showing)
2 tsp olive oil
salt and pepper, to taste
1/4 tsp dried thyme leaves
olive oil cooking spray or misto

1.  Preheat oven to 425 degrees F.  Spray a large baking sheet with cooking spray.  Be sure to choose a large enough sheet to be able to spread the potatoes out so they are not crowded and are able to sit in a single layer on the pan. 

2.  In a large bowl, mix together the mustard, 2 tsp olive oil, pepper, and thyme.  Add in potatoes and mix to coat.  

3.  Dump potatoes out onto prepared baking sheet, spreading them out to form a single layer.  Salt potatoes as you like. Then quickly spray the tops of the potatoes with the olive oil cooking spray or misto.  

4.  Roast the potatoes for 35 - 40 minutes or until  they are fork tender. 


Sunday, January 16, 2011

Blueberry Buttermilk Scones

The scone is a small British quick bread (or cake if recipe includes sugar) of Scottish origin.  Sort of a marriage between a muffin and a biscuit.  This recipe makes a tender scone, dotted with delicious blueberries.  A great breakfast bread or treat with a cup of coffee or tea in the afternoon.  These are perfect eaten plain, but you could put some whipped butter or jam on them if you desire.  When cutting in the butter, be sure to use COLD butter and don't worry about getting it too well incorporated.  Generally, the less this dough is handled, the more tender the end product will be. Don't skip the turbinado sugar topping!  It makes the most wonderful, crispy sweet topping.... I love this scone recipe, and will be working on variations in the future!


Blueberry Buttermilk Scones 
adapted from WW New Complete Cookbook

Ingredients:
1 1/2 cups all purpose flour
1/2 cup old fashioned oats
1/4 cup ground golden flaxseed
1/4 cup packed brown sugar
1 1/2 tsp. baking powder
1/2 tsp. baking soda
1/2 tsp. salt
4 TBS. COLD unsalted butter, cut into pieces
1 cup fresh or frozen blueberries
3/4 cup 1% buttermilk
1/4 cup eggbeaters ( or 1 egg white ) 
1 TBS. turbinado ( raw) sugar

Directions: 
1.  Preheat oven to 375 degrees F.  Line baking sheet with parchment paper ( easiest) or spray baking sheet with cooking spray.  

2.  Whisk together flour, oats, flaxseed, brown sugar, baking powder, baking soda and salt in large bowl.  With a pastry blender or fork, cut in pieces of butter to create a coarse meal.   Don't worry to wok it too much...larger chunks of butter are good...they will provide a "flakiness" to the scones.  Gently stir in blueberries. 


3.  Measure out the buttermilk, and then take one TBS out and set aside.  Add the eggbeaters to the remaining buttermilk and stir to combine.  Add the buttermilk/eggbeater mixture to the dry ingredients and stir gently with a fork until just combined.  With hands, knead dough about 2 times while in the bowl to finish combining ingredients.  Again, it doesn't have to be perfect...and the less you work the dough the better.  

4.  Divide the dough in half and form on the cookie sheet two 6 " rounds.  With a knife, cut the rounds into six pieces each...but don't separate cuts.  Brush scones with reserved buttermilk and sprinkle with the turbinado sugar.  
Ready for the oven


5.  Bake until toothpick inserted into middle comes out clean, or about 15 to 20 minutes.  Remove from oven, and slide the parchment paper onto a metal rack to cool.  ( or if not using parchment, let pan cook on rack for about 5 min, then remove scones to rack to cool.) Serve warm or at room temperature.

Yield:  1 doz.
Prep Time: 00 hrs. 10 min.
Cook Time: 00 hrs. 20 min.
Total Time: 30 min.

Servings - 12   Serving size - 1 scone or 1/12 of recipe   Points Plus per serving - 4 points+
Calories ( per svg) - 152,  Total Fat - 6g,   Carb. - 23g,   Protein - 4g,   Fiber - 3g

PRINTABLE RECIPE

Looking for more recipes that use blueberries?  Try this!
Blueberry Cheesecake Squares from The Tip Toe Fairy

Thursday, January 13, 2011

Crockpot Tuscan Sausage and Bean Soup

Tis the season for crockpot meals! :) This soup is easy and really, really tasty.  It originally comes from Weight Watchers New Complete Cookbook.  It's written to be cooked in a crockpot, but there is no reason you couldn't make it stovetop.  This is my first time cooking with kale...I thought about subbing the kale for spinach ( which would be a fine substitute) but then decided to broaden my horizons and just pick up a bunch of kale and give it a try.  Besides, kale is one of those winter vegetables that is in season and very reasonably priced right now.  I LOVED it with the kale.  Kale is considered to be a highly nutritious vegetable with powerful antioxidant properties and is very high in beta carotene, vitamin K, vitamin C, lutein, zeaxanthin, and reasonably rich in calcium.  Since kale is a member of the cabbage family and has a thick stem,  you will need cut it out before chopping it to add to the soup.

This soup calls for 1/2 cup of dry red wine, which I highly encourage you to use, as it imparts the most excellent flavor to the broth.  This recipe also uses canned beans...notorious for being high in sodium.  To reduce the amount of sodium in them, be sure to rinse and drain them before adding to the soup.   Next time, I will be making this soup on the stove, so I can double the recipe and have plenty of leftover for lunches during the week...but made in the crockpot it yields six generous ( 1 1/2 cup) servings at 6 points+ each.  My entire family loved this soup and so will you!


Crockpot Tuscan Sausage and Bean Soup adapted from Weight Watchers New Complete Cookbook

Servings - 6   Servings size - approx. 1 1/2 cups or 1/6th of recipe  Points plus per servings - 6 points+
Calories - 241,   Total Fat - 5g,   Carb., - 31g,  Protein - 19g  Fiber - 8g

12 oz. turkey smoked sausage ( such as Hillshire Farms brand), sliced 
2 cloves garlic, rough chopped
1 onion, diced
2 large carrots, diced
2 large celery stalks, diced
1/2 cup cauliflower florets, chopped ( optional, I added because I wanted to use them up)
1/2 medium bunch kale, stems removed, and leaves chopped ( about 4 cups)
3 cups fat free, low sodium chicken broth
2 cans ( 15.5 oz each) of cannellini beans, rinsed and drained
One (14.5 oz.) can of diced tomatoes, with Italian seasonings
1/2 cup dry red wine ( or water)
1 tsp. dried basil
salt and pepper, to taste*
juice of half a lemon

1.  In a slow cooker, combine all of the ingredients.  Stir to combine.  Cover and cook for 8 hours on low or 4 hours on high, until the vegetables are tender.  ( If you choose to cook on stove top, saute the carrots, onion, garlic, celery and cauliflower ( if using) in a little cooking spray in dutch oven or large stock pot for about 5 min.  Add the basil and cook for another minute or so.  Then add the rest of the ingredients, bring to boil, and allow to simmer, slightly covered, until vegetables are tender...about an hour or so)

2. Squeeze juice of half a lemon into the soup and stir.  Enjoy. 

*this recipe does not require much salt, if any...the sausage, the beans and the canned tomatoes add quite a bit of salt to the recipe on their own.  I would advise you to taste before you salt. 


so easy....just dump into crockpot and turn on!!


Wednesday, January 12, 2011

Crockpot Steel Cut Oats with Peaches

What could be better on a cold (and snowy) morning, then to wake up to a delicious, warm,  ready to serve breakfast that smells wonderful?  Not much...

When I saw this recipe posted by Danica on Friends for Weight Loss the other day, I knew I wanted to try it.  What I didn't know, was how happy my family was going to be to be able to scoop themselves out a nice warm breakfast as they each got up...at different times of the morning.  My sons and husband added sugar to their servings...I opted for some splenda.  This is a really easy way to get everyone to eat a healthy breakfast before they go out the door to work or school...and it makes plenty to heat up another day!  Be sure to use REAL steel cut oats ( NOT the quick cooking steel cut oats, nor the old fashioned oats...they will not stand up to the extended cooking time)  I used frozen peaches as the original recipe suggested, but the beauty of this recipe is that you can use virtually ANY frozen fruit to make your own masterpiece! 


Crockpot Steel Cut Oats with Peaches adapted from Friends for Weightloss

Servings - 12   Serving size - approx. one cup of cooked oats  Points Plus per serving - 4 points+
Calories - 164.4,   Total Fat - 2.6g,   Carb. - 33.3g,   Protein - 6.4g,  Fiber - 5.1g

3 cups Steel Cut Oats
10 cups water
2 cinnamon sticks ( or 2 tbs. ground cinnamon)
1 TBS. pure vanilla extract
pinch of salt
1 lb. frozen sliced peaches ( or frozen fruit(s) of your choice)
  1. Spray the inside of your crock pot with nonstick spray.  MUST DO or you will have a sticky mess to deal with!  
  2. Combine all ingredients in the crockpot and cook on low for 8 - 10 hours.  ( I cooked mine from 10pm to 7am and the oats were perfect.  I turned the pot off, but they kept warm for an hour or so afterward)
  3. Remove cinnamon sticks and stir well. 
PRINTABLE RECIPE

Steel cut oats have become more popular and are much easier to find than they used to be.  Quaker even makes them now.

Want More?  


Tuesday, January 11, 2011

Buttermilk and Herb Stuffing Muffins

Let me start off this post with a link for you.... Nicole, a fellow blogger and a Registered Dietitian, wrote an excellent post about Weight Watchers new PP program...her thoughts on it and WW in general.  If you are a WW, you might be interested in reading it to get a REAL LIFE RD's opinion on this program.

And now...on to the recipe....While sitting in my son's orthodontist office,  as I was paging through the November 2010 issue of Health Magazine ( this office has the most awesome up-to-date magazines!), I came across a recipe that intrigued me:  Buttermilk and Herb Stuffing Muffins.  Hmmmm....stuffing, in a muffin form, that's healthy?....I quickly had them make me a copy of the page and put in in my "to make" stack of recipes I have on my desk.  Last week I got around to making them.  I roasted a turkey breast and steamed up some green beans to go along side the "stuffing muffins."  I was happy to see once I worked up the numbers, each generously sized "muffin" comes in at 7 points+.  All the flavors are there that you would expect from a stuffing, but there is also a tang from the buttermilk which is subtle, but works well with the other flavors.  And the best part about these stuffing muffins, is that they can be made ahead and then reheated in a 350 degree F oven  for about 15 min. before serving....

Ready to be baked.  An ice cream scoop made quick work of portioning out each "muffin."

They do hold together like traditional muffins, but I would suggest eating them with a fork!

Buttermilk and Herb Stuffing Muffins from Health Magazine, November 2010


Servings - 12   Serving size - 1 "muffin"   Points plus per serving - 7 points+
Calories - 265,   Total Fat - 8g,   Carb. - 40g,   Protein - 9g,   Fiber - 4g

Cooking spray
4 tablespoons unsalted butter
2 medium red onions, chopped (4 cups)
3 thinly sliced celery stalks
1 teaspoon dried rosemary, crushed
1/2 teaspoon dried rubbed sage
1/2 teaspoon dried thyme
1/2 teaspoon freshly ground black pepper
1 (8-ounce) package mushrooms, coarsely chopped (about 3 1/2 cups)
1 cup lower-sodium chicken broth
1 (12- to 14-ounce) package country-style cubed with white and whole-wheat bread) stuffing (such as Pepperidge Farm)
1 cup low-fat buttermilk (1%)
2 large eggs

1. Coat a 12-cup muffin tin with cooking spray; set aside.

2. Heat butter in a 4- to 5-quart pot over medium heat until melted; add onion and next 5 ingredients (through pepper). Cook until softened (about 5 minutes), stirring occasionally. Add mushrooms; cook over medium-high heat until mushrooms are tender and liquid evaporates (about 5 minutes), stirring well. Add broth; simmer.

3. Preheat oven to 425°. Remove pot from heat; stir in remaining ingredients with a fork. Cover and let stand 5 minutes. Spoon stuffing mixture into 10 cups of prepared muffin tin in mounds( I got 12 easily out of the mixture); bake in middle of oven until golden on top (about 25 minutes). Let cool in oven at least 15 minutes; remove from tin.

PRINTABLE RECIPE

Monday, January 10, 2011

Potato-Leek Frittata

Frittata is an egg-based dish similar to an omelette or quiche.  This versatile frittata recipe can be made for breakfast, lunch or dinner, or makes a great snack. It can be served warm or room temperature.  It's made with leeks, a vegetable with a flavor similar to onion, but much milder.  If you don't have or don't want to use leeks, you could substitute chopped onion.  If you do use leeks, be sure to use the white and light green part only, slice it, and give it a good rinse in a bowl of cool water to loosen any sand that may be hiding between the layers.

I found this recipe in the Jan/Feb issue of Everyday Food, and even though it was written as a "lightened up" recipe, I lightened it even more by reducing the number of whole eggs and using fat free ricotta cheese.  By doing these simple substitutions, I reduced the points plus value from 6 points+ to 3 points+!  This recipe is easy and delicious, and if you don't own a nonstick skillet with a ovenproof handle, just wrap the handle in foil, before putting it into the oven.( I am submitting this "tip" to Around My Family Table's Tip Day Thursday)


Potato-Leek Frittata adapted from Everyday Food

Servings - 6   Serving size - 1/6th of frittata   Points Plus per serving - 3 points+
Calories - 108.9,  Total Fat - 3.5g,  Carb. - 10.3g,   Protein - 10g,   Fiber - 1g

Cooking spray ( I used olive oil from my misto)
1 leek ( white and light green parts only, halved lengthwise and rinsed well, and thinly sliced, 1 cup)
2 cups of frozen hash brown potatoes, thawed
4 large eggs
4 egg whites
1/2 cup fat free ricotta cheese
salt and pepper, to taste

1.  Spray a 10 inch non stick pan with cooking spray and heat on med.  Add leeks and potatoes.  Season with salt and pepper.  Saute about 5 - 7 minutes to soften leeks and warm potatoes, stirring frequently.  ( if you notice the mixture starting to brown too much, add a bit of water to finish saute).  
2.  If handle of skillet is not ovenproof, wrap in aluminum foil.  Preheat oven to 425 degrees F.

3.  In a med bowl, mix eggs and ricotta cheese.  Add salt and pepper as desired to egg mixture.

4.  Pour egg mixture evenly over the sauteed potato leek mixture, and allow to cook on stove top, undisturbed, until edges are set, about 2 minutes.  Transfer skillet to oven and bake until top of frittata is just set, 10 - 13 minutes.  ( The frittata will appear to be mostly liquid on top when you transfer it to the oven, but as long as the edges are set, the eggs will finish cooking evenly.)
5.  Invert frittata onto a platter and cut into 6 wedges.  Serve warm or at room temperature.

PRINTABLE RECIPE

Thursday, January 6, 2011

WW Dark Chocolate Cake

I want to give a shot out to a wonderful WW support group I joined a few weeks ago...it's new...and started up by Danica of Danica's Daily and it's called Friends for Weight Loss.  It is a wonderful support group full of great information, and it's free!  Consider joining it!   Danica posted a link to the new FREE Points Plus Power Foods Favorites Down-loadable Cookbook!  ( click to download your very own copy!) on this site and as I quickly printed off my copy, I noticed, on the last page, is the very cake I made on Thursday afternoon!!! 

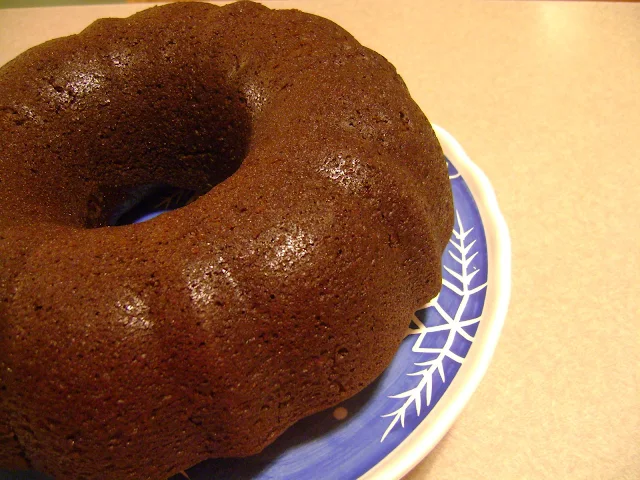
WW Dark Chocolate Cake ( click for the recipe) is featured in this handy little cookbook, and also on WW online featured recipes this week.  The thing about this cake that caught my eye was that it was made with SAUERKRAUT!  WHAT???  (yes, sauerkraut).  It really came out wonderful.  The recipe uses no eggs.  It was moist, with a deep rich chocolate flavor...and the best thing is...you can't even tell there is sauerkraut in it.  Sauerkraut is rich in vitamin C and adds a wonderful moistness to this cake. My house smelled divine as it baked!!!  Don't be afraid...try it...I guarantee you will love it!

warm from the oven.  Let it cool in the bundt pan for 10 min or so before inverting it onto a serving platter.


I dusted the cake with powdered sugar once it was cooled.  The cake serves 14 and each slice is 6 points+.

combine all dry ingredients in a large mixing bowl with whisk

My mini food processor made fast work pureeing the sauerkraut.  Be sure to add a TBS or two of water when you puree. Looks a bit like applesauce when it's done. 


My 13 year old sons slice....with a dollop of ff Greek yogurt that has been sweetened with a bit of brown sugar!  He loved it! and he couldn't guess the secret ingredient!

Egg Sandwich with Dijonnaise

I recently discovered a new use for a terrific product...Hellmann's Dijonnaise.  ( or Best Foods for those of you on the west coast ).  This is a product I keep regularly in my fridge.  I am not a hug fan of mustard...give me a ton of mayo to slather on things, and I am a happy girl....but mayo is very costly WW speaking...so ever since I read about Dijonnaise on Hungry Girl, I decided it was worth trying. One TBS. of dijonnaise is ZERO points+.   This week, I decided to use it, instead of a butter spread or spray on my egg sandwich.  OMG...I was instantly in heaven!  The tang of the dijonnaise with the gooey egg middle is remarkable.  When I use Nickels light 35 mulitgrain bread,( one point+ per slice)  this sandwich comes in at 4 points+.  Today I added a banana on the side for a very satisfying breakfast.  I encourage you to give your taste buds a treat and try this combo.   I like the egg to ooze out and get messy, so I cook my egg over-easy, but if runny yolks aren't your thing, you could cook the egg until the middle is hard!   This would also make a terrific lunch as well! 


Egg Sandwich with Dijonnaise

Servings - one sandwich    Serving size - entire sandwich   Points+ per svg - 4 points+
Calories - 147,  Total Fat - 5.5g,   Carb. - 16.4g,    Protein - 9.3g   Fiber - 3g

I large egg
2 slices of Nickels light 35 mulitgrain bread
1 TBS. Hellmann's Dijonnaise Creamy dijon spread

1.  Cook egg in nonstick fry pan coated with cooking spray to your desired doneness. 
2.  Toast two slices of the bread and spread the dijonnaise on each slice.  
3.  Assemble egg sandwich.  Enjoy!

Mine is almost empty!   I need to pick up MORE!

Monday, January 3, 2011

The Great Pasta Question and Lemony Chicken and Vegetable Pasta

I hope everyone had a good New Year celebration...mine was very low key...an evening spent at home watching movies on Netflix...lol  The tree and the holiday decorations are now all down, and I am ready to get back into a routine, one which includes a more healthy diet!! 

Everyone that does WW knows what the point values for dry pasta are, right?  Of course we do...regular pasta, 2 oz. dry is 5 points+ and whole wheat pasta, 2 oz. dry is 4 points+. But really, who only cooks 2 dry oz. of pasta at one time?  I know I don't.  I will cook a pound of pasta for my family, and then weigh out my portion once the whole pound is cooked...I don't cook 2 oz. separate.  So what does 2 oz. of dry pasta weigh once it's cooked??  I have searched and searched for an answer to this question...and finally today, I decided to do a little experimentation.  First, I weighed out EXACTLY 2 oz. of dry pasta.  (Twice, because I used regular penne type pasta and whole wheat spaghetti type pasta )

dry penne weighed out ( minus the bowl )

2 oz. uncooked whole wheat spaghetti


I cooked both pastas al dente according to package directions separately and then reweighed each.  Here is what I got:

Cooked penne ( minus the bowl )


cooked whole wheat spaghetti ( minus the bowl ) 

As you can see, the cooked pasta weighs a little more than two times the dry.  I believe it would be safe to say, if you measure out 4 oz. of cooked pasta, it would have the same amount of points as 2 oz. dry.  It didn't seem to make a difference in the shape or the composition of the pasta as to the final weight.  Mystery solved!  :) 

And now what to do with this perfectly cooked pasta?  How about a nice, light lemony chicken and vegetable pasta dish? I made this dish for lunch, and it serves one..but you could easily adjust the measurements to make a dish to serve four to six or make this into a two serving recipe for half the points!  You could also leave the chicken out for a few less points or use whatever zero point vegetables you like.


Lemony Chicken and Vegetable Pasta


Servings - 1  huge serving  Serving size - whole recipe   Points plus per serving - 10 points+ 
Calories - 395.2,  Total Fat - 8.7g,  Carb. - 56.7g,  Protein - 25.8g,  7.6g

2 oz. dry penne pasta ( cooked according to package directions)
2 oz. cooked chicken breast, diced (warm)
1 cup fresh broccoli florets
1/2 cup baby carrots
1/2 cup red pepper, sliced
1 clove garlic, minced
1 TBS. lemon zest
juice of half a lemon
salt and pepper, to taste
1 TBS. Parmesan cheese, shredded

1.  Cook the broccoli, baby carrots, and red pepper until crisp tender.  ( I used the microwave )  

2. In a small saucepan, melt the brummel and brown spread.  Add the garlic and the lemon zest.  Cook until the garlic gets fragrant.  Take off heat, and add the lemon juice.  

3.  In a small bowl, combine the cooked pasta, chicken, and cooked vegetables. Pour the garlic lemon mixture over and coat evenly.  Salt and pepper to taste.  Sprinkle on cheese.  Enjoy!  

>