Renee's Kitchen Adventures: April 2011

Friday, April 29, 2011

Butterscotch Banana Bread


Butterscotch....banana....buttermilk....


This one is a winning combination of flavors!


A perfect treat for your afternoon coffee or tea....that won't dig deep into your daily point allowance!


Made from some perfectly over ripe bananas I got for 60 cents at the store!!  What could be better??

Not much.

(Maybe an afternoon at the beach....)

Banana bread....so easy...so notoriously full of fat and calories.  Not this version.  Each moist slice is around 160 calories (5 points+).    Make it today.  Wow your family. 


Butterscotch Banana Bread
from the kitchen of MKA

Servings - 16   Serving size - 1/16th of loaf   Points Plus per serving - 5 points+
Calories - 163.7,   Total Fat - 6.1g,   Carb. - 26g,   Protein - 2.8g,   Fiber - 1.6g

1/2 cup butterscotch flavored chips
1/4 cup unsalted butter, at room temperature
1/2 cup granulated sugar
2 large eggs, at room temperature
1 cup mashed over-ripe bananas, (about 3 medium)
1/3 cup buttermilk, lowfat
1 tsp. pure vanilla extract
2 cups all purpose, unbleached flour
1 tsp. baking powder
1/2 tsp. kosher salt
1/8 tsp. baking soda

1.  Melt the butterscotch flavored chips in a small bowl over simmering water.  Set aside and let cool to room temperature. 

2. Preheat oven to 350 degrees F.  Spray large nonstick loaf pan ( 9 x 5) with cooking spray. 

3.  In large bowl, beat the butter with the sugar with an electric mixer until crumbly.  Add in eggs, one a time, beating well after each addition.   Mix in mashed banana, buttermilk, and vanilla extract.  

4. In small bowl, combine flour, baking powder, salt and baking soda.  Mix to combine.  

5.  Add dry ingredients to wet ingredients and mix until just combined.  Remove 1 cup of batter to the small bowl with the melted butterscotch chips.  Mix well with hand mixer.  

6.  Pour half of the banana bread batter on the bottom of the loaf pan.  Pour the butterscotch batter over the banana bread batter.  Top with the rest of the banana bread batter and smooth top.  Run a knife up and down to create a bit of a swirl.  ( although mine didn't swirl much! ...but you get the point. ) 

7.  Bake at 350 degrees F for 50 -60 minutes or until toothpick inserted into center comes out clean.  Cool in pan on wire rack for 15 minutes, then remove to wire rack to cool completely.  Slice into 16 pieces.  

---------------------------------------------------------

I really liked the combination of the butterscotch with the banana.  You could also do this with chocolate chips for the same nutritional value.  As always, buttermilk plays a big roll in making this bread moist, tender and light.  I think I need to start a recipe category just for recipes that use buttermilk!  lol   This recipe would also make awesome muffins! Just remember, this is a lightened up recipe and the texture of this bread is much lighter than traditional banana bread....but the taste is still awesome! 

This post is being shared with Made it On Monday @ Lark's Country Heart

Thursday, April 28, 2011

White Chocolate Bundt Cake

White Chocolate Bundt Cake is a lower calorie cake that doesn't skimp on flavor! It starts with a boxed cake mix.


Tuesday, April 26, 2011

Chicken Florentine with Pasta and Fresh Tomatoes


Tender pieces of chicken in a light garlic-lemon-Parmesan sauce served over thin whole wheat pasta and topped with fresh tomato slices.


Have I got your taste buds waking up?  Your mouth watering?  Piqued your interest?


The base of this  recipe comes from America's Test Kitchen - Light & Healthy 2010.  So far every recipe I have made from this book has been excellent, and this one does not disappoint!   It is a delicious combination of flavors.  My own spin on the dish is the addition of tomato slices and whole wheat pasta.  It made for a very filling one dish meal for around 350 calories or 9 points+!  Serve some crusty bread on the side for a complete meal.  ( the nutrition information given is for pasta dish only)

I substituted thawed frozen spinach for the fresh spinach called for in the original recipe.  By using frozen it saved me time wilting down the spinach and allowed me to really get the water out of the spinach before adding it to the sauce, but you could use fresh spinach if you wish.  Make sure to use low sodium, fat free chicken broth in this recipe, as the regular salted broth will make the sauce too salty.


Chicken Florentine with Pasta and Fresh Tomatoes
adapted from America's Test Kitchen - Light & Healthy 2010

Servings - 6    Serving size - 1/6th of recipe   Points Plus per serving - 9 points+
Calories - 349.9,   Total Fat - 6.4g,   Carb. - 46.5g,   Protein - 33g,   Fiber - 7.4g


12 oz. whole wheat thin spaghetti, cooked according to package directions to al dente
1 (10 oz.) package of frozen, chopped spinach, thawed and well drained
1 TBS. canola oil, divided
24 oz. boneless, skinless chicken breasts ( 6 - 4 oz. breasts )
salt and pepper
1 shallot, minced
2 garlic cloves, minced
1 TBS. all purpose flour ( I used a quick dissolve flour, such as Wondra) 
3 cups low sodium, fat free chicken broth
1/4 cup fat free half and half
1 tsp. grated lemon zest plus 1 tsp. fresh lemon juice
1/4 cup grated Parmesan cheese
2 small to medium fresh tomatoes, sliced

1.  In a large nonstick skillet, heat 1 tsp. of oil until hot.  Pat chicken breasts dry with paper towels, and season with salt and pepper.  Add chicken to pan and brown on each side ( about 5 minutes ).  Chicken doesn't need to be done all the way through.  Remove chicken to a platter or dish with sides to a warm oven ( 200 -250 degrees F) while you make the sauce.  (This will usually finish cooking the chicken all the way through, without it drying out)

2.  Add the remaining 2 tsp. of oil to the hot pan.  Saute the garlic and the shallot until soft, about 1 minute. Add in flour and stir to combine.  Whisk in broth.  Let mixture come to a boil, and then simmer until thickened and somewhat reduced.  Add in thawed spinach and heat through.

3.  Remove the chicken from the oven, and check for doneness.  ( chicken should be 160 degrees on instant read thermometer and no longer be pink in the middle)  Slice each chicken breast into 6 - 7 thin slices per breast on a diagonal.  Set aside.  

4. Once sauce is done, turn off heat and add in half and half, lemon zest, and lemon juice.  Test for need for salt and pepper and season if you want to.  ( I only added pepper at this point ) Add the chicken back into the sauce and top with 1/4 cup grated Parmesan cheese.  Cover to let the heat from the sauce melt the cheese. 

5.  To assemble plates, put about 4 oz. cooked pasta ( equivalent to 2 oz. uncooked) onto the plates, top with 1/6th of the chicken mixture and top with a couple of fresh tomato slices.  You can also start with a handful of fresh spinach under the hot pasta ( it will wilt somewhat with the pasta and the sauce ) if you like to veg up the dish even more.  Top with a bit more Parmesan cheese and some fresh ground black pepper. 

----------------------------------------------------------------

This dish made a nice and easy weeknight meal for us.  The original recipe called for the chicken to be put into a casserole dish and then put under the broiler to melt the cheese, but I just didn't see a need for this step.  If you like your cheese browned, then you could do that.  You could even leave it right in the skillet if you have an oven safe one.  But I was fine with just having the cheese melted.  

I also got a new camera this weekend.  The pictures from this dish were taken with it.  Not sure if I love it yet or not....still working on figuring it out.  Natural light has been such a challenge lately, as we have just been drowning in gray skies and rain.  A photographer I am NOT...lol.  Any tips and pointers from those with more experience are appreciated! :)


Tuesday, April 19, 2011

Crockpot Wheat Berry and Turkey Sausage Minestrone


First off...I apologize for the lag in postings.  We had out of town visitors this weekend, and that kept me busy cooking and entertaining...but not much time to work on getting recipes ready for this week.  Lots of good food and good company was had though!  So today, I am back with an easy crockpot soup recipe.

Thursday, April 14, 2011

Heavenly Deviled Eggs

Renee's Kitchen Adventures: Heavenly Deviled Eggs A secret ingredient makes these deviled eggs better for you! No one will ever know! #eggs #Easter

Feel like a sinner, but eat like a saint.  With Easter approaching, deviled eggs are sure to be on a lot of people's menus.  With this version, you can eat them without all the guilt usually associated with deviled eggs and all their yolky mayonnaisy badness.

Renee's Kitchen Adventures: Heavenly Deviled Eggs A secret ingredient makes these deviled eggs better for you! No one will ever know! #eggs #Easter

Why?

Because half of the yolks have been replaced with cauliflower puree!  I know...but how does it taste?  Honestly, I have been making deviled eggs this way now for a few years.  I have been taking them to BBQ's, serving them at holiday tables, and just making them for my family to enjoy...and no one ever knows there is cauliflower puree in it!  In fact, when I tell ppl once they have enjoyed the deviled eggs...they are in disbelief.

Renee's Kitchen Adventures: Heavenly Deviled Eggs A secret ingredient makes these deviled eggs better for you! No one will ever know! #eggs #Easter

I originally got the idea from the cookbook  Deceptively Delicious by Jessica Seinfeld...but over the years I have changed it a bit for my liking.   This book is great though, as it was written as a way to sneak vegetables into picky kids diets without them being the wiser...but I know a lot of adults that could benefit from this sneakiness too!  lol

I am so happy the chives in my backyard herb garden are up and ready to use!  I LOVE to garnish these beauties with fresh snipped chives....not only does it make them gorgeous, but chives and egg are natural taste partners in the food world! 

A product that I have recently discovered and used in these deviled eggs is Grey Poupon Deli Mustard with Horseradish.   In the past, I used both Dijon or a grainy mustard AND a bit of horseradish...but all you need is this product to get the same flavors.  It's also excellent on sandwiches!  The horseradish is mild, and doesn't overpower the flavor of the egg, it just gives it that extra something special.


For the puree, I used a  bag of frozen cauliflower ( you can use fresh too!) which I microsteamed ( or you can cook on the stove) until the cauliflower was fork tender.  Then I popped it into my food processor ( you can use a blender if you don't have one) and pureed it up with about a TBS or two of water, until it was nice and smooth.  It's important to get it really smooth, because you really don't want chunks of cauliflower in the yolk mixture.  You can either chill the cauliflower before you process it or after...it doesn't really matter.  You will have extra cauliflower puree left over, which you can use in another dish, or just freeze for another time.

Visit RecipeLion for an excellent tutorial on making perfect hard boiled eggs.  I once read that the older eggs actually are better for hard boiling because the membrane is not as tight around the shell and makes for easier peeling, but I have never actually tested this theory.  It does make sense though.  I like to follow the boil gently for 10 -12 minutes and then immerse  immediately in cold water method myself.  

I usually triple this recipe when I make it for Easter and at least double it when I make it for anything else. 

If you need to bring an appetizer to Easter dinner next week...take these and dazzle everyone! 


Heavenly Deviled Eggs
adapted from Deceptively Delicious by Jessica Seinfeld

Servings - 6   Serving size - 2 deviled egg halves   Points Plus per svg - 2 point+
Calories - 72.4,   Total Fat - 4.7g,   Carb. - 1.3g,   Protein - 5.5g,   Fiber - 0.3g

Ingredients: 

6 large hard-boiled eggs, peeled and halved
1/4 cup cauliflower puree, chilled
3 TBS. reduced fat mayonnaise
1 TBS. Grey Poupon ® deli mustard with horseradish
salt and pepper, to taste
fresh snipped chives for garnish

Directions: 

1.  To puree the cauliflower:  I used a  bag of frozen cauliflower ( you can use fresh too!) which I microsteamed ( or you can cook on the stove) until the cauliflower was fork tender.  Then I popped it into my food processor ( you can use a blender if you don't have one) and pureed it up with about a TBS or two of water, until it was nice and smooth.  It's important to get it really smooth, because you really don't want chunks of cauliflower in the yolk mixture.  You can either chill the cauliflower before you process it or after...it doesn't really matter.  You will have extra cauliflower puree left over, which you can use in another dish, or just freeze for another time. 

2.  Pop out the yolks from the halved hard boiled eggs and reserve three whole yolks.  Discard the other three.  (or do what I did, and just feel them to the dog.  Yolks are great for making their coats shiny!)  Take the three reserved yolks and combine with the cauliflower puree, mayo, mustard and salt and pepper.  I like to use the food processor to get a very smooth filling. *

3. Pipe or spoon the egg yolk mixture back into the halved egg whites.  Garnish with fresh snipped chives. 

* Sometimes I add a TBS. of finely diced shallot and/or a TBS. of capers to add more flavor to the filling.

I love deviled eggs...and often make them just to have for snacks.  When they are made this way, I can enjoy them with less guilt!  Do you like deviled eggs?  Will you be having them this Easter with your dinner?  


Wednesday, April 13, 2011

Homemade New York Style Bagels with Low Fat Strawberry Cream Cheese Spread

New York Style Bagels with Low-fat Strawberry Cream Cheese Spread

Seriously, one of the easiest and most delicious things I have ever made!  Who knew making bagels was so easy?  Homemade NY Style Bagels seem to be a popular food blog item as of late, and I wanted to hop on the bandwagon too!  I go in spurts, where I really get into making yeast breads....like Oatmeal BreadMulitgrain Bread, Challah Bread,  and Cinnamon Rolls.   I like to cook, but I will tell you, my real passion lies in baking.  I just love to bake!  I probably love it too much...but this was the first time I have ever made bagels. 

New York Style Bagels with Low-fat Strawberry Cream Cheese Spread

I took the recipe for these bagels from one I had seen on two blogs I regularly follow, MyBizzyKitchen and PreventionRD.  Both Nicole and Biz talked this recipe up BIG, so I knew it would be good! ( you can find both of their original posts about these bagels by following the links on their recipe indexes, respectively)   I also saw an excellent tutorial on TastyKitchen last week, with a recipe as well...but in the end I chose to make Nicole and Biz's recipe...because it used Vital Wheat Gluten Flour.  By adding a bit of Vital Wheat Gluten Flour, ( I used Bob's Red Mill brand, found in the organic or specialty baking area of most large grocery stores) you are almost assured a super chewy texture.  Score!  Vital Wheat Gluten Flour also has 23 grams of protein per 1/4 cup.

I used my scale to weigh out the flours. I have found that measuring by volume for yeast breads really is one of the keys to success.  I used my stand mixer with the dough hook to make the dough.  It easily and quickly came together, and by doing it this way, I didn't need to add any more flour than necessary to make a smooth dough nor do any kneading by hand.  I let the dough rise in a covered bowl, which was sprayed with my misto, for about an hour and a half.  It was cold in my kitchen, so I turned on my oven to 400 degrees, let it get to temp, turned it off, and then placed the covered bowl on top of the stove where the surface was now very toasty.   Biz mentioned that her dough didn't rise much, but mine did, and I was able to punch it down before forming the bagels.  Her bagels came out fine without much of a rise...so don't worry if your dough doesn't rise much or at all. 

I noticed, after following Nicole's yeast conversion suggestion and putting in 1 1/4 tsp. of yeast into my dough ( I buy in a big container from Costco and keep it in the fridge) that both her recipe and Biz's recipe called for a package of yeast. (Nicole stated that a package was equivalent to 1 1/4 tsp.)  The equivalent to one package of active yeast is actually closer to  2 1/4 tsp...but it was too late to adjust.  The recipe came out FINE with 1 1/4 tsp.  so I am keeping that amount in my recipe version.  If you like, you can use an entire package of dry active yeast though.

I weighed out the dough after I punched it down, and got around 800 grams...so I divided that by 10 to get 10 bagels that were about 80 grams each.   I found using the rope and twist method Nicole used for forming the bagels suited me the best.  You can also just form the dough into a ball and then poke out the middle.

New York Style Bagels with Low-fat Strawberry Cream Cheese Spread

 I omitted the extra salt in the water bath...because I just didn't see a need for more salt since it already had baking soda in it.  It didn't seem to matter much in the end that I didn't put salt into the bath...I suspect it was just there for flavor, but I am not sure.

Oops!  One of them wasn't twisted good enough!
These bagels were wonderful.  Tasty, doughy and chewy...like a NY bagel should be.  As good as the ones you get in NY?  Um....sorry, no...but much, much better than the ones you can buy in the grocery store.  Do not expect a crusty outside...they have more of a soft pretzel like exterior. 

I choose to make mine plain...but really, you can top these with whatever you like...or flavor the dough even.

What could make these plain bagels even better?  Low fat Strawberry Cream Cheese is what!


I should have refrigerated the spread for a bit to firm it back up before using it....but um...I was hungry and ready for breakfast!  and yes, this was the LAST bagel ( which I hid in the freezer for myself ) left from yesterday.  Yup, my family liked them that much!  Guess what I am making more of this afternoon?  


Homemade New York Style Bagels with Low Fat Strawberry Cream Cheese Spread
adapted from recipes seen on MyBizzyKitchen and PreventionRD


For Bagels Servings - 10   Serving size - 1 bagel   Points Plus per svg - 4 points+
Calories - 163.5,   Total Fat - 0.5g,   Carb. - 29.7g,   Protein - 8g,   Fiber - 1g

For LF Strawberry Cream Cheese:  Servings - 12   Serving size - 1 TBS.   Points Plus per svg - 1 point+
Calories - 26.7,   Total Fat - 1.6g,   Carb. - 2.3g,   Protein - 1.1g,   Fiber - 0.3g

Ingredients:
1 1/4 tsp. active dry yeast
1 1/2 TBS. granulated sugar
1 1/4 cup warm water ( 105 - 110 degrees F )
16 oz. all purpose, unbleached flour ( about 3 cups + 3 TBS.)
1.8 oz. Vital Wheat Gluten flour ( I used Bob's Red Mill ) ( about 1/4 cup)
1 1/2 tsp. salt
2 TBS baking powder
2 TBS eggbeaters or one egg beaten with a bit of water for egg wash

Directions:

  1. In a two cup glass measuring cup, add water, sugar and yeast.  Allow to sit for 5 minutes, until the yeast begins to foam up.  
  2.  Measure out flours and salt into stand mixer bowl.  Afix the dough hook on the mixer and mix the flours and salt for a about 30 seconds.  With mixer running on low, slowly stream in water/yeast mixture, and allow dough to come together...it will start to come clean from the sides and then you will want to run the mixer on med/high to knead the dough till smooth and elastic.  This will take about 8 - 10 minutes.  I didn't need to add more liquid nor more flour, but you might need to to get the consistency you want .  The dough should not be sticky.  
  3. Remove dough to large bowl that has been coated in cooking spray ( I used my misto with olive oil ).  Turn dough to coat lightly in oil.  Cover and allow to rise in warm place for about an hour or until dough has almost doubled in volume.  ( I needed to let it rise for an hour and a half ) Punch down, removing all air pockets and divide equally into 10 pieces.  
  4. Shape each piece into a 10 " log and then loop it around to form a bagel shape OR you can poke your finger through the middle of each piece of dough after rolling them into a ball shape, then extend your fingers to make a 1" opening.  
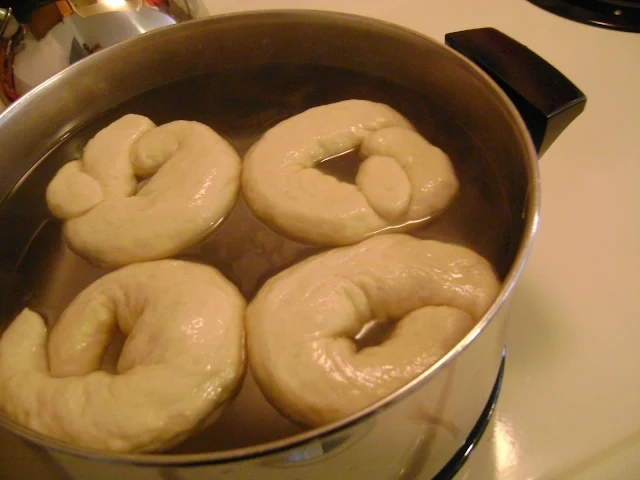
  5. Preheat oven to 425 degrees F.  In a large pot, bring water to a boil and add baking soda.  In batches, boil each bagel for one minute on each side...then place on baking sheet that has been coated in cooking spray, lined with parchment or non stick foil, or use a silpat. 
  6. Brush each bagel well with egg substitute or egg wash and top as desired..or leave plain like I did.  
  7. Bake for 16 - 18 minutes, or until tops are golden brown.  Cool on rack slightly.  Once cooled, store in plastic zipper bag for up to 3 days or freeze for up to a month. 

To Make Low-Fat Strawberry Cream Cheese Spread

1 - 8 oz. package of 1/3 less fat cream cheese, at room temperature
1 cup sliced fresh strawberries
1 TBS. powdered sugar

Combine all ingredients in food processor and process until smooth.  Allow to sit in refrigerator for at least 30 minutes before using, to allow flavors to blend and spread to thicken up a little.  Serve with homemade NY Style Bagels. 

Yesterday, I took a drive to my daughter's college campus.  She has quite a bit of money left on her food plan that needs to be used up before the semester is over...or we just loose it.  So we ate dinner on campus ( they have a sort of full service Damon's so I got grilled chicken and a baked potato ) and then went to the market to shop.  We mostly bought pantry items for her for next year, since she will be living off of campus and not have a food plan...but I scored some really awesome things for us at home...and let me tell ya, I was really impressed with the selection on the on campus market!  I must say, it must speak to the more discriminating palates of today's youth!  Nice change from burgers and fries! 

Some of my excellent loot from one of the campus markets!


Monday, April 11, 2011

Asian Slaw


Not your typical mayonnaise type slaw.  Don't get me wrong...I AM a MAYO lover, but I know there are mayo haters out there too...but even us mayo lovers like a lighter mayo- less slaw every now and then. 

I cut up some fresh cabbage for this dish because I had some on hand left over from some soup I made earlier in the week, but you could use the package coleslaw mix to make it more convenient. Or how about using napa cabbage?  Yum!  That would work well too!   The flavor of this slaw sort of reminds me of the very popular salad several ago made with uncooked ramen noodles.  Does anyone remember that one?  I remember that recipe used an obscene amount of oil...something like a cup.  Anyway...that is what the flavors in this recipe remind me of. 

We had this slaw with some teriyaki beef kabobs ( Market Day ) and it was a perfect compliment!  I also used leftover slaw the next day inside some "clean out the fridge" fried rice!  It was great! 


Asian Slaw

Servings - 10   Serving size - 1/10th of recipe or approx. 1/2 cup   Points Plus per svg - 1 point+
Calories - 49.4,   Total Fat - 3.1g,   Carb. - 5g,   Protein - 1.4g,   Fiber - 1.5g

4- 5 cups shredded green cabbage
1 cup shredded carrot
3 - 4 scallion, finely sliced ( green and white parts )
1/4 cup toasted, unsalted sliced almonds
3 TBS. plain rice vinegar ( NOT seasoned )
1 TBS. low sodium soy sauce
1 TBS. honey
1 squirt of sriracha sauce ( optional )
1 TBS. canola oil
1 tsp. toasted sesame oil
salt and fresh ground pepper, to taste

1.  In large bowl, combine the cabbage, carrots, sliced scallions and almonds.  (If you have raw sliced almonds, you can dry toast them on the stove in a nonstick skillet until they start to brown and become fragrant.  Let them cool before adding to salad.) 

2. In small bowl, combine the rice vinegar, soy sauce, honey, and sriracha ( if using) with a whisk.  Whisk in the canola oil to make a vinaigrette.  Whisk in sesame oil.  Pour onto the cabbage mixture and mix well.  Allow to sit ( in fridge or on the counter ) for about 30 minutes before serving to allow flavors to blend.  Season with salt and pepper to taste. 


The weather was wonderful this weekend, and I think my family got a week's worth of outdoor spring cleaning done in a day.  The vehicles all got washed, the flower beds got cleaned up, the lawn got a dose of fertilizer, the garage got spiffed up,  we pulled out some dead or almost dead rhododendrons in the backyard and more!  Busy!  Of course, a front is moving in...and it is supposed to be in the 40's tomorrow, so the nice spring weather was a bit short lived.  The trees are finally starting to show some evidence of life...and I can see tiny, tiny leaves peeking through on my crabapple tree.  The tips of the daffodils are beginning to turn a slight yellow also, meaning the blooms will be out shortly.  I am sooo sooo ready to end this miserable winter!  I really want to get out and fire up my grill!  I just love grilling stuff...and I love the fact that clean up is reduced so much by cooking outdoors!  Hopefully, in the months to come, I will have some great marinades and grilled items to share!  How about you...do you love to grill or eat grilled food? 


Friday, April 8, 2011

"Cake Donut" Mini Muffins


A mini muffin + the distinct taste of a cake donut = LOVE!  I came across this recipe on Tasty Kitchen a few days ago....and I DID say I should make muffins more often, so I bookmarked the recipe and made it today.  Easy and I think they are really cute all dusted in powdered sugar...they sort of remind me of donut holes.


Make sure you use fresh grated nutmeg!  Really, it makes a ton of difference.  I buy the nutmeg in the whole nut form and then grate what I need on my microplane.  Once nutmeg is ground up, it quickly looses flavor, so even if you buy a fresh bottle of ground nutmeg at the store, it will not taste as good or strong as the freshly grated nutmeg!  And the nutmeg in it's whole form will last a LONG time in your spice cabinet! 

I didn't really lighten up the original recipe....but I did use skim milk.  The recipe wasn't specific to the fat content of the milk it called for.  The original recipe did tell you to make regular sized muffins...but I really thought mini's would be cuter AND more diet friendly since I wasn't reducing any of the called for fats in the recipe.  I think you could sub out some of the oil for applesauce....and if you do, let me know how they come out.  But I think these little babies are fine just as they are!

The original recipe also called for the muffins to be baked at 350 degrees F, which seemed like a pretty low oven for muffins to me...so I increased the oven temp to 400 degrees F and baked them for 10 -15 minutes.  I will tell you though, I have been having some issues with my oven lately, so please make sure to check them often since I am going by how my oven baked them.

The powdered sugar coating is not included in the nutritional info, because I didn't use much of the original amount called for...but you will need to put at least that much in the bowl in order to properly coat the mini muffins.  There will be quite a bit of powdered sugar left over. 

"Cake Donut" Mini Muffins
adapted from Tasty Kitchen

Servings - approx.  30 mini muffins   Serving size - 1 mini muffin   Points Plus per svg - 2 points+
Calories - 71.9   Total Fat - 2.7g,   Carb. - 10.9g,   Protein - 1.2g,   Fiber - 0.2g

1 3/4 cup all purpose, unbleached flour
1 1/2 tsp. baking powder
1/2 tsp. kosher salt
1/4 tsp. nutmeg ( I might have put a bit more in...I like nutmeg!)
1/2 tsp. ground cinnamon
1/3 cup canola oil
3/4 cup granulated sugar
1 egg
3/4 cups skim milk
1 cup powdered sugar ( not included in nutritional info as you will use only a small portion of this )

1.  Preheat oven to 400 degrees F. Spray the wells of a nonstick coated mini muffin pans with cooking spray. Do not use liners for this recipe, because you want to coat the entire muffin with powdered sugar.

2.  In a large bowl, combine the flour, baking powder, salt, nutmeg and cinnamon with a whisk.  Set aside.

3.  In a small bowl ( or I used a 4 cup glass measure ), combine the oil, sugar, egg and skim milk.  Add the wet ingredients to the dry ingredients and mix until just combined.

4.  Fill the wells of the mini muffin pans with about a TBS or so of batter, pretty much up to the top.  Bake for 10 -15 minutes...checking often.

5.  While still warm, roll in powdered sugar to coat and let cool on wire rack. 

I think these little guys are so cute.  They taste just as good cool as they do warm.  I think they would be perfect to take to a party or bring to a meeting or just make them for fun!  I think everything is cuter when it's a mini, don't you?  lol 

Thursday, April 7, 2011

HG's Egg Benechick


I seem to be feeling nostalgic lately, as I keep making all the oldies but goodies.  This Eggs Benedict recipe is no exception.  I think it might be the very first HG recipe I ever made.  I was VERY skeptical when I first read exactly what went in together to make the fake out "hollandaise" sauce....but was very pleasantly surprised at the end result.  So much so, that I actually crave this combo now and then. 

Of course, I added my own spin on it by adding baby spinach on the bottom...why not?  more stuff to wipe up the saucy goodness with!   I also replaced the traditional english muffin half with two slices of Nickels Light 35 Mulitgrain bread and used a 3" cookie cutter to get two round shapes and then stacked them on top of one another.  You can toast it...but I don't...I like it soft. 


To determine just how much bread I used doing this method, I weighed out one whole slice and got 17g.  Then I cut two discs and weighed them...I got 18g.  So I just used the nutritional information for 1 slice to arrive at the total point value for two bread discs. In order for the point plus values to be accurate, be sure to use bread that is 1p+ per slice. 


I also used 1 oz. Hillshire Farm Deli Select Smoked Ham ( for 2 oz. cal= 60, fat = 1.5g, carb = 1g, protein = 9g, fiber = 0g which calculates to 1p+)  in this recipe and that is the ham I based my calculations off of.  I could have used 2 oz....but it seemed like too much ham...but if you like, you can increase the amount of ham to 2 oz. and it will still be 1p+.

I  did not use fat free mayo ( ew!) as the original HG recipe called for.  I used Hellmanns' light Mayo.  I love REAL mayo, but in this case, using the full fat stuff...increased the point+ value of the sauce by one...so I opted for the reduced fat stuff.  Don't even ever consider buying the fat free stuff...it's just gross and you need so very little of it for this recipe...what on earth would you do with the rest of the jar if you bought it?

I have used both the lemon flavored yogurt and the plain yogurt with the addition of lemon juice.  I like it both ways...so just use what's convenient for you.  Again, once you open the flavored yogurt and take out 1 tsp...you are kind of committed to eating it.  For this reason, I most often use the plain fat free yogurt ( I buy a big container with a removable lid ) with a squirt or squeeze of lemon juice. 

Since this recipe is assembled, rather than combined, I choose to count each item separate, only calculating out the nutritional information for the sauce....which IS combined.  :) 

HG's Eggs Benechick

Servings - 1   Serving size - whole recipe  Points Plus per serving - 6 points+  ( poached egg = 2+, 1 oz. ham = 1+, spinach = 0, bread = 1+, sauce = 2+ )
Nutritional Information for entire recipe of fake out hollandaise sauce:  Calories - 63.5,   Total Fat - 6.3g,   Carb. - 2.3g,   Protein - 0.2g,   Fiber - 0g

2 slices of Nickels Light 35 Mulitgrain Bread ( or other bread that is 1+ per slice), cut into discs with a 3 " cookie cutter....(give the crust scraps to the dog!)
1 large egg, poached
1 oz. lean ham ( I used Hillshire Farm Deli Select Smoked Ham ), or other ham that 1 oz. = 1p+
handful of fresh organic baby spinach
Fresh ground pepper

For sauce:
1 TBS. reduced fat mayo ( such as Hellmann's light)
1 tsp. Hellmann's Dijonnaise 
1 tsp. light whipped butter or light buttery spread such as Brummel and Brown, softened
1 tsp. nonfat lemon yogurt or plain nonfat yogurt with a squirt of lemon juice

1.  Combine all ingredients for the sauce in a small microwavable container or bowl. Set aside.

2.  Assemble the egg dish by placing the spinach on the dish, topped with the bread discs, the ham, and the poached egg.   

3.  Heat in microwave on HIGH for about 20 seconds.  Remove and stir.  Add water if you like it looser.  ( I usually do)  Pour over egg and sprinkle with fresh ground pepper.  Enjoy!


I had this with two lovely Cutie Mandarin oranges from California this morning for a yummy and filling 6 point+  breakfast.  I am so happy these little clementine type oranges are now available this time of year.  So easy to peel and so sweet!  Have you tried the Mandarin oranges from California?  If you haven't pick some up the next time you are at the store!  

Miz Helen’s Country Cottage

Wednesday, April 6, 2011

Portabella Mushroom "Pizzas"


Mmmmm...pizza that isn't really pizza....but still tastes like one.  You get three of these babies for 5 points+ !  Simple and easy....


Take three medium sized portabella mushrooms, scrape out the gills, cut down the stem if you need to and treat the shell just like a pizza crust.


I choose to go the traditional route...with mozzarella cheese,  pizza sauce ( I used Ragu pizza quick) , pepperoni, a sprinkle of oregano and some fresh basil once the "pizzas" were done cooking.  If you swap the pepperoni for a zero point foods such as onion and pepper, you can eat three of these for 4 point+! 


Portabella Mushroom "Pizzas"

Servings - 1   Serving size -3 portabella "pizzas"   Points Plus per svg - 5 points+
Calories - 189.6   Total Fat - 10.7g,   Carb. - 12.3g,   Protein - 12.4g,   Fiber - 2.7g

3 medium sized portabella mushrooms ( 5 -6 oz total weight)
1/4 cup Ragu Pizza Quick Sauce, traditional flavor
1 oz. part skim mozzarella cheese, shredded
5 -6 pepperoni slices ( about 10g), quartered
salt and pepper
oregano
fresh basil leaf, torn

1.  Preheat oven to 400 degrees F.  Spray a baking dish with cooking spray.  Set aside.

2.  Wipe mushroom with a damp paper towel.  With a spoon, scoop out gills of the mushroom and cut the stems down as small as possible.  Set the mushrooms, cap side down on the prepared baking dish.  Sprinkle with salt and pepper.

3.  Divide the 1/4 cup of pizza sauce evenly among the three mushroom caps.  Sprinkle the mozzarella cheese evenly among the three mushrooms.  Arrange the pepperoni quarters evenly among the mushrooms.  Sprinkle with oregano.

4.  Bake for 10 - 15 minutes or until cheese is melted and mushroom is soft.  Divide the basil leaf among the three "pizzas" and enjoy!

This is yet another recipe I made frequently during my early days with WW.  I find it to be a very suitable substitution for pizza...but if you don't like mushrooms, you would probably not agree with me. Me...I LOVE mushrooms.  One thing it does, is save a ton of points because it uses no "flour" crust and because of it, you can eat more than one tiny slice!  If the weather EVER gets nice, you can also grill these outside.  It gives them a whole different flavor...in a good way!  How about you, are you a mushroom lover or a mushroom hater? 

Tuesday, April 5, 2011

Fresh Veggie Wrap (4 Points Plus)


When I first started WW, one of my favorite lunches was a Fresh Veggie Wrap.  Incredibly simple...but oh so good.  It's chevre, spinach, carrots and roasted red peppers, finished with a splash of light balsamic vinegar.  I haven't eat this wrap in a long time.  I don't know why...but when I spotted my favorite spreadable goat cheese at the store, I was quickly reminded of this incredible wrap and decided to bring it back into my life. 


This spreadable goat cheese is outstanding.  It is creamy and mild and spreads wonderfully right from the fridge.  It's local to me and I am "lucky" to be able to enjoy it!  :)  It calculates to 2 points+ per 1 oz.  If you aren't a fan of goat cheese you could  substitute hummus, it works equally as well as a base for this wrap.   This is another recipe where I am not going to furnish nutrition information, but rather count up the points manually.  It has so few ingredients, most of which are zero point foods, that this seems like the best way to calculate points for this item. 

Fresh Veggie Wrap 
4 Points Plus

2 point+ tortilla wrap of your choice
1 oz. Chevre ( spreadable goat cheese - 2 point+)
handful of fresh, organic baby spinach
1 carrot, grated
2 - 3 roasted red pepper strips ( freshly made or from jar )
splash of balsamic vinegar or a light balsamic vinaigrette

1.  Spread the tortilla with the chevre.  Place the spinach, carrot, roasted red peppers on top.  Splash with balsamic vinegar.  Wrap up and enjoy! 

It's so good to rediscover old favorites like this one.  And for 4 points plus, it makes a great meatless wrap for very few points!  I think I will be enjoying this one quite a bit this spring!  Do you have any "go to" recipes that you used to make all the time, but then for some reason just stopped making them?

This post is linked to Tasty Tuesdays and Delectable Tuesday

Sunday, April 3, 2011

Easy Cheese Danish ( 4 Points Plus )


An easy homemade cheese danish that is 4 points plus per danish?  Yup....it's true.  This is a recipe that I have been making for a few years now.  It's my youngest son's very favorite.  The original recipe is from one of my very favorite celebrity chef's...Ina Garten and can be found in her cookbook, Barefoot Contessa at Home.  I think I own most of her cookbooks.  I really love her simple style....good ingredients = good food.  I've lightened her recipe by using low fat cheeses, reducing the amount of egg yolks in the cheese mixture ( which doesn't seem to bother either the texture nor the taste ) and by making the danishes a bit smaller per serving.  Even with the size being smaller, this still, I think, is a very generously sized pastry.


I decided to cut the puff pastry sheets into 9 pieces, instead of the 4 pieces called for in the original recipe.  This sized puff pastry square comes in at only 3 points plus each without any filling.  Wow!


I then decided to fill half with just the plain cheese mixture and add a 1/2 tsp. of  apricot jam to the other half.  It was a nice flavor combo!  Be sure to line your baking sheets with either parchment, non stick foil, or as I used here, a silpat.  LOVE my silpat!


When folding over the tips, try to stretch them and tuck them underneath if you can.  I didn't do this, and had quite a few of them open up for me during baking.  If you can tuck the tips under the danish, you have less of a chance of them opening.  If they open, they won't be as pretty, but they will still be delicious!


These are best enjoyed warm right from the oven...but they are also good once they cool too.  How do they keep?  I have no idea.  They have never lasted more than a few hours around my house!  lol


Easy Cheese Danish
adapted from Barefoot Contessa at Home

Printable Version

Servings - 18   Serving size - 1 danish   Points Plus per serving - 4 point+
( Nutritional information for plain cheese danish ) Calories - 156.5   Total Fat - 9.6g,   Carb. - 13.6g,   Protein - 3.5g,   Fiber - 0.2g


1 (17.3 oz.) pkg. frozen puff pastry, defrosted ( I used Pepperidge Farm )
8 oz. 1/3 reduced fat cream cheese, softened
1/3 cup granulated sugar
1 large egg yolk, at room temperature
2 TBS. low-fat ricotta cheese
1 tsp. pure vanilla extract
1/4 tps. kosher salt
zest of one lemon
1 egg, beaten w/ TBS. water for egg wash

1.  Preheat the oven to 400 degrees F.  Line 2 sheet pans with parchment, non stick foil or silpats.

2.  Place cream cheese and granulated sugar in large bowl and beat with electric mixer until smooth.  With mixer on low, add in yolk, ricotta, vanilla extract, and salt and mix until just combined.  Fold in lemon zest with rubber spatula.  ( don't use mixer, the zest will stick to the beaters )

3.  Unfold one sheet of puff pastry onto a lightly floured work surface.  ( I used waxed paper ) Roll the pasty slightly with a floured rolling pin until it's roughly a 10" x 10" square.  Cut the sheet into 9 pieces with a sharp knife.  Transfer squares to pan.  Place a 1/2 TBS of cheese mixture in the middle of each square.  With pastry brush ( or I just use my finger tips ) brush the border of each danish with egg wash and fold two opposite corners together at center and try to stretch tip under pastry, brushing and overlapping so they firmly stick.  Brush the tops of the pastries with egg wash.  Repeat with remaining puff pastry sheet and filling.  ( You may have extra filling leftover )

4.  Put baking sheets into refrigerator for 15 minutes.  Then, bake for about 20 minutes, or until golden brown and puffed.  Serve warm.


I really cannot tell you how wonderful I think these are!  The possibilities for flavor combos are endless too...with all the wonderful fruit spreads available.  The lemon zest in them gives them that little extra thing that makes them super special, I think. These are perfect for a lazy Sunday morning brunch ( which is usually when we enjoy them ) or an afternoon treat with a cup of coffee or tea.   I can't help it....I love flaky puff pastry!  Do you like pastry items?  

Friday, April 1, 2011

Chipotle Black Bean Burgers with Corn Topped with Mango Pineapple Salsa

Inexpensive and easy to make Black Bean Burgers with Corn is a tasty recipe for black bean burgers that uses common ingredients found in most kitchens! Top with store bought Mango Salsa for a delicious sweet heat. 

Chipotle Black Bean Burgers with Corn on plate topped with mango salsa


Ever since I opened a can of chipotle peppers in adobo sauce for soup last week, I have been obsessed with trying to find ways to use them up. If you aren't familiar with canned chipotle peppers in adobo sauce they pack an impressive smokey heat to just about anything you add them too!

When I found a recipe for Chipotle Black Bean Burgers with Corn, I knew they would be the perfect recipe to include them in. Plus...I had a container of mango pineapple salsa in the fridge I was dying to find something to use it on. 

I was right, the sweet mango salsa complimented the slightly spicy and smokey burger perfectly.  The base recipe for the burgers comes from America's Test Kitchen Light & Healthy 2010.  I have made several recipes out of this book since I purchased it, and have been happy with everything I made so far.  This recipe is no exception.

Chipotle Black Bean Burgers with Corn formed and ready to cookThis is an inexpensive, easy and tasty meatless dish, and in my opinion, way better than the processed frozen black bean burgers you can find in the stores.  My boys loved it....my husband...well...as a total meat and potatoes Midwest kind of guy...he wasn't so impressed...but like the boys, I really enjoyed this for dinner. 

You can serve them like regular burgers on a bun with fixin's but I served them by themselves, topped with salsa and a side of simply roasted sweet potato rounds seasoned with salt and pepper and a sprinkle of cinnamon.  YUM!

If you like spice....increase the amount of chipotle peppers you use or add some cayenne into the mix as well.  I found the recipe to be on the mild side as written.  I also did not "fry" the patties in olive oil as the recipe called for, eliminating 2 TBSP of oil from the original recipe, and reducing the fat and calories.  I simply sprayed a nonstick skillet with my Misto and pan sauteed the burgers that way.

If you are looking for tasty recipes to make with black beans or looking for a good black bean burger, give this recipe a try! It's super easy to make and doesn't call for any weird ingredients.


Chipotle Black Bean Burgers with Corn 
 adapted from America's Test Kitchen Light & Healthy 2010

Printable Recipe

Servings - 6   Serving Size - 1 burger   Points Plus per Svg - 5 points+
( Nutritional information for burgers only )  Calories - 226   Total Fat - 5g,   Carb. - 34g,   Protein - 12.5g,   Fiber - 9.8g

2 slices of high-quality white bread, torn into pieces ( I used Pepperidge Farm )
2 large eggs
1 TBS. olive oil
1 tsp. ground cumin
1/2 tsp. salt
2 (15-oz.) cans of black beans, rinsed well and drained
1/4 cup red pepper, finely diced
1/4 cup cilantro, chopped
1/4 cup onion, finely diced
1 TBS. chipoltle pepper in adobo sauce, finely chopped ( or more if you like )
3/4 cup frozen corn, defrosted
Olive oil spray ( such as from a misto )
Mango salsa, for garnish


1.  Preheat oven to 350 degrees.  Place torn bread into a food processor and pulse into crumbs.  Spread crumbs on baking sheet and bake until golden brown and dry, about 10 - 12 minutes.  Set aside to cool.

2.  In small bowl or glass measuring cup, whisk the eggs, 1 TBS. olive oil, cumin, and salt together.  Set aside.

3.  Place 2 1/2 cups of the rinsed and drained beans in a large bowl, and mash with a potato masher until mostly smooth.  Stir in the reserved bread crumbs, reserved egg mixture, remaining half cup of whole beans, red pepper, cilantro, onion, corn and chipotle pepper until just combined.  Divide into 6 equal portions ( a little over a half cup each ) and gently form into 1 inch thick patties.

4.  Heat a large nonstick skillet which has been sprayed with cooking spray over a med- high heat.  Saute half the patties for 8 - 10 minutes, flipping halfway through.  Remove to plate and repeat with remaining patties.    Garnish with salsa, if desired,  and enjoy immediately. 

>