Renee's Kitchen Adventures: June 2011

Thursday, June 30, 2011

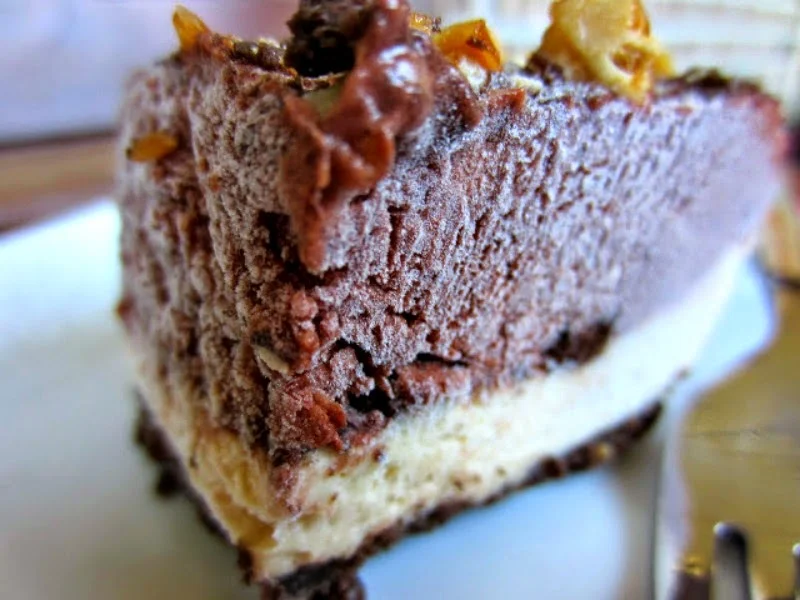
Frozen Peanut-Chocolate Mud Pie

Renee's Kitchen Adventures:  Frozen Peanut Chocolate Mud Pie

If you are looking for something WW friendly, yet delicious to serve this weekend at your celebration, look no further.  The original recipe comes from Kraft Foods and you can find it HERE.  When I first came across this recipe, I instantly knew I could switch up a few ingredients and make it much more diet friendly, without sacrificing taste.  I was really pretty happy with the result.

Ready for the freezer.

While this is delicious frozen, one word of caution is to remove it from the freezer and give it plenty of time to thaw before cutting into it or eating it.  The chocolate layer gets VERY hard.  After we enjoyed a few pieces frozen, I decided to leave the entire thing in the refrigerator overnight to see if it would stay together.  I am happy to report that it did,  so instead of it being a frozen treat, it was more like a creamy treat...and still delicious.

the peanut butter layer....oh my!  yummy to the max!

How all the layers look from the side.  Pretty!

Be sure to follow directions and line your baking dish with plastic wrap, so you can easily remove the pie once it is frozen.


Frozen Peanut-Chocolate Mud Pie
adapted from Kraft Recipes.com


Servings - 16   Serving size - 1/16th of pie   Points Plus per serving - 5 points+
Calories - 203,   Total Fat - 8.6g,   Carb. - 27g,   Protein - 3.4g,   Fiber - 1g


5 - 100 calorie pkgs. of Oreo Thin Crisps, crushed 
1/4 cup unsalted butter, melted
1 tub ( 8 oz.) Light Cream Cheese Spread
1/4 cup peanut butter
1/4 cup granulated sugar
1 tub ( 8 oz ) Cool Whip FREE, thawed and divided
2 TBS. chopped peanuts
1 ( 1.4 oz.) box  of sugar free chocolate fudge pudding mix
1 1/2 cups cold fat free milk

1.  Line an 8" or 9" baking dish with plastic wrap, with ends extending over sides to use as handles later to remove frozen pie from pan.  Mix 1 cup of cookie crumbs ( reserve the rest for later )  with melted butter and press into bottom of pan.  Place in refrigerator until ready to use. 

2.  Beat cream cheese spread, peanut butter and sugar in medium bowl with electric mixer until combined.  Gently stir in half the container of cool whip FREE.  Spread mixer over crust.  Top with half the remaining cookie crumbs.  

3.  In same bowl used for peanut butter mixture, combine the milk and the pudding mix.  Mix for 2 minutes until mixture begins to thicken.  Fold in remaining cool whip FREE.  Spread over crumb mixture.  Top with remaining crumbs and chopped peanuts.  

4.  Cover with plastic wrap and seal tightly.  Freeze overnight.  Remove from freezer and allow to sit at room temperature at least 20- 30  minutes before slicing and serving.  Use plastic wrap handles to remove dessert from pan before cutting into squares. 

----------------------------------------------

Yesterday, my husband and I celebrated our 20th anniversary.  Honestly, I cannot believe that much time has passed in my life  It goes by so quickly!  We went out to a really nice dinner at a local restaurant.  We shared a bottle of wine!  oh my!  lol  It was a really nice time, but I think I used up most, if not all, of my extra points for the week....so goes it.  I will need to be extra careful to stay within my point limits for each day this week. 

I missed my WW meeting this week, because I had already had a haircut appointment scheduled from 6 weeks ago, and my hair really needed a trim!  I treated myself to a mani and pedi also, and the girl talked me into trying some gel polish on my nails, with claims it will last 3 weeks!  I normally just get a buffing on my nails, no polish...so we will see.  Has anyone ever tried the new gel polish before?  If you have, what do you think of it?  so far so good for my mani!

This post is being shared with:

Tuesday, June 28, 2011

Sean's Kimbap ( Korean "Sushi" Rolls)


A few weeks ago, on a trip to visit my brother and sister-in-law, upon our arrival in the evening, my sister-in-law had a plate full of delicious Kimbap waiting for us. My sister-in-law is an incredible cook!   I am a huge fan of sushi, but I had never had Kimbap before.  It is basically just like sushi, but with the nori on the outside and the rice on the inside...which makes it so much easier to assemble.


I told my sister-in-law how much I enjoyed these, and she graciously offered to show me how to make them.  She said they were easy, and she was right.  She is a first generation American Korean...and she explained  that Kimbap is seasoned rice with an assortment of vegetables and some sort of protein ( cooked ) rolled up inside seaweed sheets.  It is basically Korean picnic food and is usually not eaten with any sort of dip or garnish.

When we got back, I set out to try my own hand at making these delicious rolls.  I was happy to find out the  sushinori was easy enough to find in my local grocery store along with the short grained sushi rice.  I always have toasted sesame oil, plain rice vinegar, and sesame seed on hand...so I was all set there.  I needed to decide on what meat/veg combo I wanted, and settled on a California roll type filling.  ( Imitation crab, avocado, cucumber, and carrot).  I picked up a bamboo mat for rolling, but honestly, didn't really need it.  ( It worked great for pictures though....and it was only a dollar! )


I cooked up my rice, seasoned it, and then cut up the veggies and imitation crab into long strips.  I did decide to cook up the carrots for a few minutes in some boiling water to soften them up to the same crunch as the cucumber.  I seasoned the cucumber slices with a bit of rice vinegar and salt before assembling the rolls...but you don't have to do either steps if you don't want to.  My sister-in-law used some really delicious pickled radish in place of the cucumber that I didn't have access to.  Next time I go to visit and we go to the Asian Market, I will be picking some up to bring back home with me.

You probably will not use up all the cucumber and the carrot called for in the ingredient list in your rolls.  If you don't, just eat them as a side!  

My sister-in-law's Kimbap!  so much neater than mine!
If you are a California Roll fan...give these Kimbap a try!  My boys loved them!


Sean's Kimbap ( Korean "Sushi" Rolls) 
recipe from my sister-in-law, Sean!  


Servings - 3   Serving Size - one full roll, cut into 6 pcs   Points Plus per serving - 7 points+ w/avocado, 6 points+ wo/ avocado
Nutritional Information for roll w/ avocado - Calories - 279.9,   Total Fat - 5.1g,   Carb. - 48.9g,   Protein - 8.4g,   Fiber - 4.5g
Nutritional Information for roll without avocado - Calories - 248.8,   Total Fat - 2.9g,   Carb. - 47.6g,   Protein - 8.1g,   Fiber - 3.5g

3 sheets of Roasted Seaweed ( sushinori ) 
2 cups cooked white short grain, sushi rice, warm
1 tsp. toasted sesame oil
1/2 tsp. sugar 
3 TBS. plain rice vinegar
1 TBS. roasted white sesame seeds
3 pcs. of imitation crab meat, sliced into small logs
1 carrot, sliced into small logs
1 english cucumber, sliced into small logs
1/4 of an avocado, sliced into small strips
1 bamboo mat - for rolling ( optional ) 

1. Mix the warm rice with the sesame oil, sugar, rice vinegar and sesame seeds. 

2.  To assemble rolls, place one sheet of sushinori on bamboo mat, if using.  Spread 2/3 cup of rice on the sheet, leaving about a 1/2 inch toward the top without rice. 

3.  Place the meat and the veg at the end toward you, in a long strip across the sushi sheet.  

4.  Roll up jellyroll style away from you. ( you can use the bamboo mat to help you do this if you are using)  When you get to the end, you can wet the seaweed sheet to allow it to stick to itself. Squeeze the roll tight.   Cut into 6 equal slices and serve cut side up.  Repeat with remaining ingredients to make three rolls total. 

----------------------------------------------------

As I said, if you enjoy California rolls, you will like these....and they really are easy to make.  I am hoping with practice, one day, mine will look as good as Sean's!  lol 

Do you like sushi?  Have you ever made it at home?  

This post is being shared with:

Monday, June 27, 2011

Chicken and Zucchini Enchiladas

Chicken and Zucchini Enchiladas are a great way to enjoy Mexican flavors with the added value of hidden veggies. Added bonus, your family will never guess it's hidden inside the tortillas either!

Chicken and Zucchini Enchiladas with sour cream, lime wedge and cilantro garnish

Wednesday, June 22, 2011

Corn, Black Bean and Avocado Salad

Renee's Kitchen Adventures: Corn, Black Bean and Avocado Salad

Here in Ohio, we have been getting corn grown in Georgia shipped up...and let me tell you, it has been just spectacular!  Sweet and tender.  I have been eating mine just naked....no butter, no seasonings, no salt....and enjoying every bite.  Corn on the cob is certainly a right of passage for summer ( and so is watermelon!)  It really wouldn't be summer without them!  But when the stores give you a price for 10 or a dozen ears of corn and you have a family of 4, there is bound to be a few ears left over. Insert Corn, Black Bean and Avocado Salad.

This salad is easy and tasty.  You can use frozen corn in place of fresh...but the fresh sweet corn gives it such a great flavor and texture.  The inspiration for this recipe comes from Whole Foods Recipes. 


I used jarred pickled jalapenos in here, simply because I didn't have fresh jalapeno on hand, but when I make it again, I will be sure to use a fresh, seeded and chopped jalapeno pepper instead of the jarred kind.  If you aren't a fan of cilantro ( yes, I know, you either love the stuff like me or you hate it! ) you can sub plain chopped parsley.

The recipe as written, gives a generous serving size of approximately one cup.  You can half the serving size if you wish for half the points+.  I had this salad with two poached eggs on top for lunch yesterday....and it was delicious and filling!  


Corn, Black Bean and Avocado Salad
adapted from Whole Foods Recipes


Servings - 6   Serving size - approx. 1 cup of salad   Points Plus per serving - 6 points+
Calories - 229.6,   Total Fat - 5.6g,   Carb. - 37g,   Protein - 11.1g,   Fiber - 11.8g

kernels from 3 medium sized ears of fresh sweet corn, cooked ( I used leftover corn from a few nights ago) 
1 - 15.5 oz. can of black beans, rinsed and drained
1/2 cup red onion, chopped
1 medium red or orange bell pepper, seeded and chopped
chopped jalapeno pepper, to taste
3 scallion, white and light green parts only, chopped
1 TBS olive oil
2 TBS UNseasoned rice vinegar OR white vinegar
1 TBS fresh lime juice
pinch of sugar
salt and pepper, to taste 
1/2 avocado, chopped
1/3 cup chopped cilantro OR parsley

1.  Combine corn, black beans, red onion, bell pepper, jalapeno, and scallions.  In 4-cup glass measure or small bowl, whisk together olive oil, vinegar, lime juice, sugar and salt and pepper.  

2.  Pour dressing over the corn mixture and gently stir to combine.  Cover and refrigerate for about an hour to let flavors mingle.  

3.  Before serving, add avocado and cilantro.  Stir well.  Enjoy!

------------------------------------------------
Today is my middle son's 17th birthday!  Happy birthday to him!  He has requested an ice cream cake, so a stop at Dairy Queen will be happening later today.  Fortunately, I am more of a cake and buttercream icing sort of gal, and much less an ice cream lover...so portion control will not be so challenging for me. 

The problem with an ice cream cake....is making sure you have enough freezer space to store the darn thing!  

Ice cream is certainly a summer food to me, as well as the aforementioned corn on the cob and watermelon.  It wouldn't seem like summer without these in my menus.  What foods remind you it's summer?  


Tuesday, June 21, 2011

Banana Berry Oat Muffins


My fruit bowl has been full of some very ripe bananas for several days now.  Normally,  I would peel them and cut them up into pieces, then pop them into a freezer bag and freeze for some banana "ice cream", but my freezer had plenty of frozen bananas in it already.  So....I decided to search for a recipe.  The first thing I made was an EPIC FAIL!  ( see, I told you if it isn't good, it doesn't make the blog!)  It was a banana cake that ended up down the disposal!

I still had several banana left to use up, and saw a recipe for Cranberry Banana Oat Bread on the Whole Foods Market Recipes app that looked pretty good.  So this morning, I thought I would give another banana recipe a go.  This one turned out great!!  I decided to do muffins instead of bread and used a dried mixed berry combo in place of the cranberries.  They made the whole house smell wonderful and I even had one for breakfast.


The original recipe called for 1/4 tsp. of fresh squeezed lemon juice, and since I didn't have a lemon already cut into, and decided I wasn't about to cut into one for 1/4 tsp. of juice, I subbed plain white vinegar ( I am assuming the lemon juice was there for the acid component for the baking powder) and it worked out just fine!

I have said before, I am just not that big of a muffin fan...but I did enjoy my muffin this morning! 


Banana Berry Oat Muffins
adapted from Whole Foods Market Recipes


Servings - 14 muffins   Serving size - 1 muffin   Points Plus per serving - 5 points+
Calories - 175,   Total Fat - 6.4g,    Carb. - 27.7g,   Protein - 2.8g,   Fiber - 1.5g


1 1/4 cup all purpose flour
3/4 cup quick cooking oats
1 TBS. baking powder
1/2 tsp. salt
1/2 cup dried berries ( such as cranberries, blueberries, cherries )
1 1/4 cup mashed bananas ( approx. 3 med-large sized) 
2 large eggs
1/3 cup canola oil
1/2 cup sugar
1/2 tsp. pure vanilla extract
1/4 tsp. fresh lemon juice OR white vinegar
1 TBS. raw sugar ( to sprinkle on top of muffins before baking - optional) 

1.  Heat oven to 350 degrees F.  Coat muffin wells with cooking spray or line with paper or foil liners.  ( recipe yields 14 muffins, so you will need two pans.) 

2.  In large bowl, combine the flour, oats, baking powder, salt and dried berries.  Set aside.

3.  In med bowl, combine the banana, eggs, oil, sugar and lemon juice OR vinegar. 

4. Combine the wet with the dry ingredients and mix until JUST combined.  DO NOT overmix!  

5.  Fill muffin tins about 3/4 of the way full.  Sprinkle with raw sugar.  Bake for about 30 minutes or until toothpick inserted into center comes out clean.   Cool on rack. 

----------------------------------------------------

It seems I have been hitting a bit of a dry spell with cooking ideas.  I don't know why I do this....I have PLENTY of resources at my disposal...but every now and then...I just don't know what to make.  This would be part of the reason why recipes have been a bit scarce lately.  Maybe with this banana muffin recipe, I am out of my slump!  

I have been watching the show Masterchef lately.  Anyone else watch that show?  It's home cooks competing for the title of Masterchef and the monetary prize that goes along with it.  I cannot imagine myself competing!  I seriously do not know how they do it.  I need recipes....it doesn't look like they use any.   I will just stick to my blog!  lol 

Do you watch Masterchef?  What do you do when you are in a cooking idea slump?  

This post is being shared with:

Tuesday, June 14, 2011

Strawberry-Rhubarb Cobbler

Renee's Kitchen Adventures:  Strawberry-Rhubarb Cobbler #strawberries #rhubarb #dessert

Fresh strawberries and fresh rhubarb....all bubbly warm under a low fat sour cream biscuit topping.  Yum!  Something about a sweet-tart syrupy sauce soaking into a warm biscuit that makes my heart skip a beat!  Strawberries are at their peak right now....sweet and delicious.  I loved the tart taste of the rhubarb married with the sweet strawberries in this dessert.

Leave your strawberry pieces larger than this if you want to see strawberries in the finished cobbler

This is a tweaked WW recipe that I will certainly make again.  The original recipe called for frozen strawberries and frozen rhubarb, but I had just picked up 4 lbs. of absolutely beautiful strawberries from Costco this past weekend....

Lovely, arent they?

and I wanted to use them.  They were a fine substitute for frozen fruit in this recipe.  One word of caution though, leave the berries large cut or whole if you want pieces of strawberry in the dish, otherwise they just kind of melt into a liquid...which is fine...but I would have liked to have chunks of strawberries to eat with the rhubarb pieces. 

Ready to bake!

The biscuit dough is made in the food processor for easy prep.  The original recipe calls for kneading and rolling out the dough, but did not see a need for it.  I just plopped it "drop-style" down on top of the strawberry-rhubarb mixture and then sprinkled it with some raw sugar. 


A delicious dish for a cool late spring night! 


Strawberry-Rhubarb Cobbler
adapted from WW online


Servings - 8   Serving size - 1/8th of recipe   Points Plus per serving - 6 points+
Calories - 213,   Total Fat - 4.8g,   Carb. - 38.6g,   Protein - 4g,   Fiber - 2.4g


1 pound fresh strawberries, whole or large cut, stems removed ( or unsweetened, frozen, thawed for 15 minutes)
14 oz. fresh rhubarb, cut into one inch pieces ( or frozen, thawed for 15 minutes)
1/3 cup granulated sugar
3 TBS. cornstarch
1 1/3 cup all-purpose flour
3 TBS. granulated or raw sugar, divided
3/4 tsp. baking powder
1/4 tsp. baking soda
pinch of salt
3 TBS. unsalted butter, cold, cut into cubes
1/2 cup fat free sour cream
1/4 cup fat free milk

1.  Preheat oven to 375 degrees F.  Spray an 8" square baking dish with cooking spray.  

2. In a large bowl, combine the strawberries, rhubarb, 1/3 cup sugar and cornstarch.  Mix well.  Spoon into prepared baking dish.  

3.  In large bowl of food processor, with dough blade attached, combine the flour, 2 TBS. sugar, baking powder, baking soda,  and salt.  Pulse once or twice to mix.  Add in the butter and run until coarse crumbs form.  

4.  Add in the sour cream and then, with processor running, pour in milk through the spout on top, and process until dough just comes together.  

5.  Drop the dough, by tablespoonfuls,  on top of the strawberry-rhubarb mixture evenly.  Sprinkle with remaining 1 TBS. sugar.  

6.  Bake for 45 minutes, or until filling is bubbly and the top is golden brown.  Cool for 20 minutes before serving, to allow the sauce to thicken up a bit.  


----------------------------------------------------------

I was surprised to find that yesterday, I was left at the end of the day with 6 points+ to use up.  Trust me, that does not happen too often!  So I was in luck, that this recipe made a dessert that came out to 6 points+ a serving!   As one reviewer on the WW site said, this is like a strawberry-rhubarb pie...and she was right.  The flavors are there!  

This was my first time cooking/baking with rhubarb.  I have eaten things with it before, sure, but never actually bought it at the store and cooked with it.  I have been trying to expand my produce selections these days.  It's all part of the new lifestyle change.  I have been on a secret mission to make something with every single item available in my store in the produce section!  Have you tried something "new to you" in the produce department of your store lately?

Thursday, June 9, 2011

Ratatouille


Ratatouille, a traditional french vegetable stew, is a great addition to your healthy summer menus.  It is a wonderful combination of summer vegetables with herbs, and if you are counting points plus, comes in as a zero point side dish.  Delicious with grilled chicken as an accompaniment.


This recipe comes from my cookbook, Williams-Sonoma Essentials of French Cooking.  Ratatouille is much easier to make than it is to pronounce!  It is a one pot stew that can be eaten warm or at room temperature...which is perfect for those warm summer days and evenings.  The original recipe called for fresh tomatoes, but I substituted canned with juices just to make things easier.  You can substitute dried thyme and rosemary if you like, but make sure to use fresh basil...


Give ratatouille a try...and you will be saying ooo la la!  lol


Ratatouille
adapted from Williams-Sonoma Essentials of French Cooking


* I am not going to list nutritional information for this dish, as it is essentially a zero point + food.  The recipe makes approx. 10, 1 cup servings. 

1 - 28 oz. can of diced tomatoes  ( you could certainly use fresh tomatoes as well, about 8 of them, peeled and diced, discarding the seeds )
2 tsp. extra virgin olive oil OR misto filled with olive oil OR cooking spray
2 small, sweet onions, chopped
1 med sized eggplant, cut into one inch cubes
4 cloves garlic, minced
2 zucchini, cut into one inch cubes
1 large green pepper, cut into 1 inch pieces
1 large red pepper, cut into 1 inch pieces
3 sprigs of fresh thyme ( or 1 tsp. dried ) 
1 sprig of fresh rosemary ( or 1 tsp. dried and crushed ) 
1 bay leaf
1/2 tsp. salt
1/2 tsp. fresh ground black pepper
1/4 cup minced fresh basil

1.  In a large, heavy saucepan, over medium heat, warm the olive oil or cooking spray.  Reduce heat to med-low and add the onions, and saute until translucent, about 2 minutes. 

2.  Add the eggplant and garlic, and stirring frequently, cook until the eggplant is softened.  ( 3 - 4 minutes) 

3.  Add the zucchini and peppers, and stir frequently until softened, about 4 - 5 minutes.  

4.  Add the tomatoes and the juices from the can, the thyme, rosemary, bay leaf, salt and pepper and cook, stirring and turning about 2 - 3 minutes longer.  

5.  Reduce heat to low and cover.  Cook stirring occasionally, until the vegetables are soft and have somewhat blended together, about 40 minutes.  Stir n the basil and remove from heat.  

Serve hot or at room temperature, garnish with additional fresh basil just before serving. 


------------------------------------------------------------

I made this dish a few weeks ago, and there were plenty of leftovers to have for lunches during the week.  I loved having a tasty zero point food in the refrigerator at my disposable.  I think that always makes it much easier to stay on plan during the week.  

I didn't have any, but I imagine, topping this dish with a bit of crumbled goat cheese would be wonderful!  

I also want to give a thanks and a shout out to Marguerite @ Cajun Delights for handing me down some pretty awesome blog awards!  Before the week is out, I will have a list of blogs to hand them down to as well.  Thanks Marguerite!  And if you get a chance to check out her blog, do so....LOTS of wonderful Cajun inspired recipes!  It will make you wish you were living on the bayou!

This post is being shared with:
Wednesday, June 8, 2011

Chicken Teriyaki Burgers


A delicious twist on the plain old burger!  Asian flavors mixed right into the burger then basted with teriyaki sauce.  I topped mine with a 1/2 slice of light havarti cheese, a grilled fresh pineapple slice and some sauted peppers and onions.  Perfection!


If you can't find ground chicken breast, it's super easy to make your own in the food processor from raw boneless, skinless breasts.  Just make sure the breasts are dried off well, and then pop them into the food processor with the blade in position and pulse until the chicken appears ground up...about 10 - 12 pulses.  That is the method I used for these burgers.  This was the first time I attempted making my own ground chicken breast and I was surprised how easy it was. I wish I had photographed the process...but I didn't. 


Chicken Teriyaki Burgers
from the kitchen of MKA


Servings - 6 burgers   Serving size - 1 burger ( no bun, no cheese, no toppings )   Points Plus per serving - 4 points+
Nutritional Information for burger only:  Calories - 179.4,   Total Fat - 1.8g,   Carb. - 14.1g,   Fiber - 0.3g

1 1/2 lbs. ground chicken breast ( or make your own in your food processor ) 
1/2 cup teriyaki sauce, divided ( I used Kikkoman Teriyaki Sauce ) 
1/2 cup plain, panko breadcrumbs*
1 egg, slightly beaten
1 TBS. fresh ginger, minced
2 TBS fresh cilantro, chopped
3 scallions, whites and light green parts only, finely chopped

1.  Combine ground chicken, 1/4 cup teriyaki sauce, 1/2 cup panko breadcrumbs, egg, ginger, cilantro and scallions in a bowl.  *If mixture seems too wet to form patties, add a little bit more panko breadcrumbs until it is able to hold shape. Some teriyaki sauces are thinner than others and may require more panko to hold patty shape. 

2.  Form into 6 patties.  Refrigerate for 30 minutes.  

3.  Grill over med-high heat, basting with reserved 1/4 cup teriyaki sauce.  Grill burgers until they are cooked all the way through or until internal temperature reaches 165 degrees F.  

4.  To serve:  place on toasted sesame rolls and garnish with a light cheese slice ( such as havarti or swiss ), grilled pineapple slice, and sauteed onion and green peppers and a bit more teriyaki sauce.  

--------------------------------------

I was really amazed at how easy it was to make my own ground chicken breast in the food processor.  If you use this method, you really do need to be sure your breasts are as dry as possible before processing them by patting them with a paper towel. 

I am looking forward to making these again....we all enjoyed them very much! 

Thursday, June 2, 2011

Easy Summer Fruit Salad

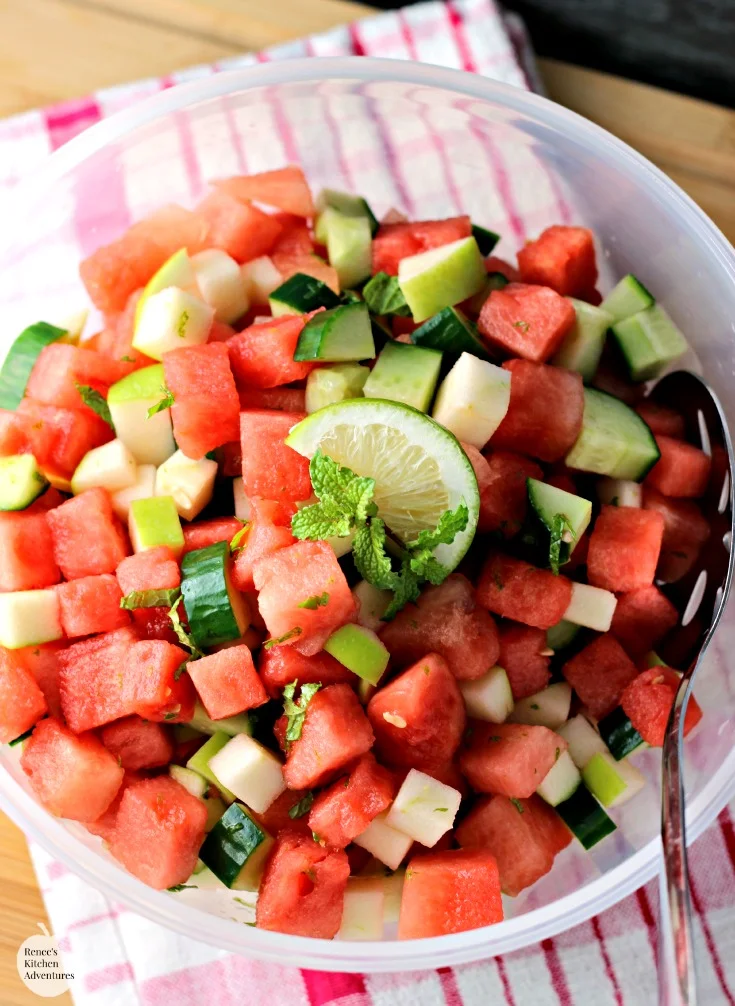
This Easy Summer Fruit Salad is delightfully different from your ordinary fruit salad.  Sweet melon, refreshing cucumber and crisp apple combine with lime and mint for a taste sensation that makes a great side dish or a snack anytime of the day! 

Easy Summer Fruit Salad | by Renee's Kitchen Adventures - a healthy and easy recipe for watermelon, apples, and cucumber accented with lime and mint.  So refreshing!
>