Renee's Kitchen Adventures: April 2012

Thursday, April 26, 2012

Ham and Asparagus Quiche


Some days, I crave eggs.  It's sort of crazy, but I could go for weeks without even thinking about eggs, and then one day it hits me like a ton of bricks.  That's what happened this week...and luckily for me, I had a package of frozen Pillsbury pie crusts in the freezer.  Quiche for dinner!

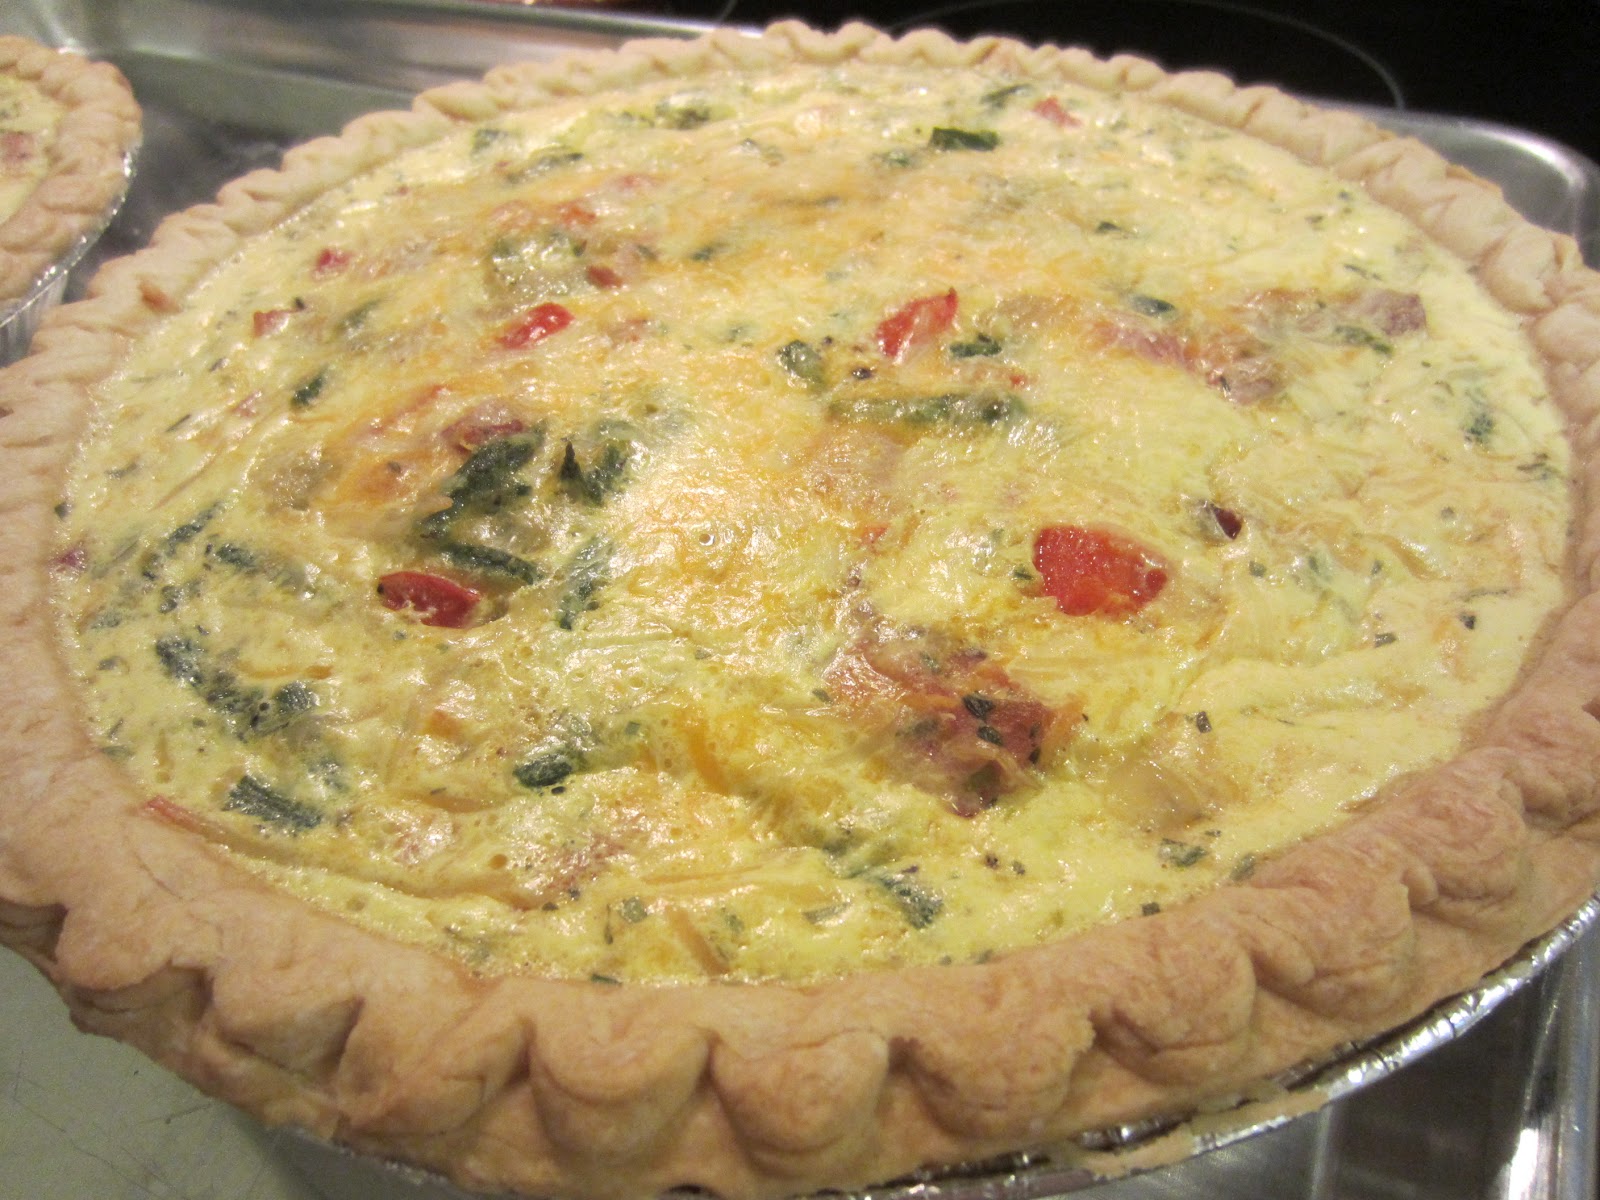
This quiche recipe is both delicious and lighter than most quiche recipes you will find, because it uses fat free half and half instead of cream.  I love this base recipe and really, you could add just about ANYTHING you like into the filling.  I searched my fridge, and ended up with this combo of ham and asparagus..with the addition of onions, red peppers and of course, cheese.  If I would have had some mushrooms in the fridge, they would have been in there too!  :)

One of the best thing about this recipe is that it makes two quiches.  Each serves six.  If you don't eat both the quiches right away, the extra quiche can be frozen.  The baked quiches freeze beautifully, and can be thawed and reheated in about 30 minutes.  Paired with a fresh garden salad and some fresh fruit, this makes a super quick and easy weeknight meal.


Of course you could use your own pie crust as well...but I really like the Pillsbury frozen ones and for this quiche, they taste almost as good as homemade with far less work.  As for "crustless" quiche...well, call me a purest, but I believe a quiche isn't a quiche without a flaky crust.  :)

These quiches don't take very long to assemble...Start by sauteing up all the veg and ham in a nonstick pan...


Add one fourth of filling to each pre-baked pie crust...


Followed by 1/4th of the cheeses...


Then pour 1/4th of the egg mixture on top...and repeat all layers...


Until everything is all used up!


And then bake both pies at 350 degrees F for 40 - 45 minutes or until the middle is set.  Allow to cool for about 10 minutes before cutting into it...and then ENJOY!!


Ham and Asparagus Quiche
from the kitchen of MKA


Servings - 2 pies, 6 servings each pie ( 12 servings)    Serving Size - 1/6th of one pie   Points Plus per Serving - 6 Points +
Calories - 213.7,   Total Fat - 10.6g,   Carb. - 17.3g,   Protein - 12.9g,   Fiber - 0.7g


2 Pillsbury Pet-Ritz Deep Dish Pie Shells, baked according to package directions
1 TBS unsalted butter
1 cup chopped onion
1 cup chopped red bell pepper
1 cup roughly chopped asparagus ( I used frozen spears that I slightly defrosted under cool water so I could chop them)
1 cup diced lean ham (5% fat)
1/2 tsp. dried thyme 
5 large eggs
1/2 cup eggbeaters
1 cup skim milk
1 cup fat free half and half
1 TBS. all purpose flour
1/2 tsp dried tarragon
pinch of nutmeg
1/2 tsp. salt
1/4 tsp. fresh ground black pepper
1 tsp. Dijon mustard
1 1/2 cups reduced fat cheese of your choice ( I used cheddar) 
1/4 cup grated Parmesan cheese


1.  Bake the pie shells according to package directions, take shells out to cool slightly.  Turn oven to 350 degrees F.  

2.  In a large nonstick skillet, melt the butter on med high heat, and add in the onion and pepper and asparagus ( if using fresh).   Cook until they begin to soften.  Add in the ham and the thyme.  (you can also salt and pepper the mixture if you like. I do)  If using frozen asparagus, like I did, cook the onion and pepper until soft, then add in the asparagus with the ham.  Turn off heat and set mixture aside.  

3. In a large bowl, combine the eggs, eggbeaters, skim milk, fat free half and half, flour, tarragon, nutmeg, salt, pepper and Dijon mustard.  Mix well with whisk.  

4.  Now you are ready to layer the quiches...begin with 1/4th of the veg/meat mixture on the bottom of each pie shell, followed by 1/4 of the cheeses, then 1/4th of the egg mixture and repeat until all the meat/veg mixture, cheeses, and egg mixture is used up.  

5.  Bake the quiches in a 350 degree F oven for 40 - 45 minutes or until the quiches are set.  Allow to cool for at least 10 minutes before cutting.  Can be served warm or at room temperature.  

*If freezing the second quiche...wrap well in foil and plastic.  When ready to reheat, thaw quiche and cook at 350 degrees F for 20 - 30 minutes or until warmed through. 

----------------------------------

This was a yummy dinner one night, and my second quiche is in the freezer for another meal.  A Sunday brunch, perhaps!  I served this with a garden salad and some of the best cantaloupe I have eaten this season.  Even with the pie crust, this made a very nice WW friendly dinner!  

Like I mentioned...I think a quiche should have a flaky bakery type crust.  That's just me.  How about you?  Is the crust important to you...or could you do without? 


Wednesday, April 25, 2012

Easy Pickled Cucumber Salad


Now that we are getting well into spring, quick and easy salads are beginning to appear on my dinner table again.  One of my very favorite dishes to make is this Easy Pickled Cucumber Salad.  Honestly, it's not really much of a recipe at all...just a few ingredients.


I like to slice my English cucumber and red onion very thin with a mandolin...but it's not essential. A fine slice with a knife will also do the trick.  I have always had a love affair with cucumbers...just love their refreshing flavor.  Paired with the sweetness of red onion and the tartness of rice vinegar...this makes a wonderful accompaniment to just about anything grilled.

The longer the cucumber and the onion sit in the vinegar mixture, the more "pickled" it will become.  The cucumber will loose a lot of it's weight in water thanks to the salt...so depending on how long you choose to let it sit, you may want to drain off the excess juice before serving.


Easy Pickled Cucumber Salad
from the kitchen of RKA


Servings - 4   Serving Size - 1/4th of recipe   Points Plus per serving - 0 Points+
Calories - 17.7,   Total Fat - 0.1g,   Carb. - 4g,   Protein - 0.8g,   Fiber - 0.9g


1 large English cucumber, sliced very thin ( on a mandolin if possible)
1/2 of a small red onion, sliced very thin ( on a mandolin if possible)
at least 1/4 tsp. salt ( or more to liking)
fresh ground black pepper, to liking
 about 2 TBS. UNSEASONED rice vinegar
pinch of white sugar ( optional ) 


1.  Season cukes with salt and pepper.  ( Since I slice the cukes on a mandolin, l like to lay them out in a flat layer to salt and pepper them before adding them to a bowl, since they tend to stick together.  I also pour the vinegar on top of them as they are in this position as well, then combine them with the red onion in the bowl)  

2.  Transfer the seasoned cukes to a bowl and combine with the red onion slices.  Mix the sugar, if using, with the rice vinegar, and pour over the cukes and onions.  Mix well to combine.  Allow mixture to sit at room temperature for at least 15 minutes before serving.  You may want to drain off any excessive juices that accumulate before serving as well, depending on how long they sit before serving.  If making the night before, just store in the refrigerator and then drain before serving.  


----------------------------------

I honestly do not know why I tend to make this salad during the warmer months and not all year long.  English cucumbers are readily available year round and are fairly economical.  

I'm excited, because I took a little extra out and put it in a container for myself today.  Honestly, I could eat this as a snack...it's that good.  

Sometimes I use the sugar, sometimes I don't.  A lot of it depends on how sweet the red onion is.  The recipe comes out fine either way.  

And all for a true ZERO points plus!  

Last week I potted some herbs on my patio ( basil, mint, rosemary) and put some parsley in the ground next to my chives and oregano.  I was pleased to find out that because we had such a mild winter this year, the potted thyme came back without a problem.  I also bought the cutetest potted lettuces!  We made a salad for dinner one night last week, and you just cannot beat fresh picked lettuce!  Unfortunately, this week we are having a bit of a cold snap, so I have been bringing my pots in every night!  Ugh...I hope this cold goes away soon!  lol  But I am soooo happy to have fresh herbs at my fingertips once again!  

How about you?  Do you grow herbs? 


Looking for more tasty cucumber recipes?  Try these!


Dilled Cucumber and Radish Salad
Lemony Cucumber Salad
Asian Style Cucumber Salad 


Like what you see?  Follow RKA on all these social networks!!

Thursday, April 19, 2012

Almost Guiltless Creamy Chocolate Pie


A few years ago ( pre-blog days) I made  WW Creamy Lemon Pie and just loved it.  It had been on my mind for the past few weeks because of a post WW made on facebook, linking up the recipe.  I remembered how good and how easy it was, and thought it might actually make a really good creamy chocolate pie with a few changes.  Wow...I was so right!  


There is some serious deliciousness packed into this simple dessert.  Divided up into 10 servings, each one comes in at a respectable 7pp.

As you can see, I didn't bother making my own crust this time.  I went with a store bought Oreo Pie Crust from Nabisco.  But if you would rather, you could make your own crust with graham crackers or oreo cookies or even those 100 calorie oreo packs.  ( Nutritional information might be different from what is provided if you choose to use another type of crust)


I topped this lovely pie with some Fat Free Whipped Topping, a little bit of dark chocolate shavings ( using my handy microplane)  and a few chocolate covered espresso beans. 

I know you want to take a bite... :)


Almost Guiltless Creamy Chocolate Pie
adapted from WW Online


Servings - 10   Serving size - 1/10th of pie   Points Plus per Serving - 7 Points+
Calories - 240,   Total Fat - 8.2g,   Carb. - 38,3g,   Protein - 6g,   Fiber - 0.8g


1 Nabisco Oreo Pie Crust
1 - 14 oz. can Fat Free Sweetened Condensed Milk
2 eggs
2 oz. unsweetened chocolate, melted
1 tsp. instant espresso powder, dissolved in about a TBS water
1/2 tsp pure vanilla extract
4 oz. Fat Free Whipped Topping ( 1/2 a small container) 

1.  Preheat oven to 350 degrees F.  

2.  In large bowl, whisk together condensed milk, eggs, melted unsweetened chocolate, dissolved espresso powder, and vanilla extract until smooth.  

3.  Pour mixture into Oreo Pie Crust and bake on baking sheet for about 20 minutes.  ( the mixture will still look somewhat unset in the center...this is fine)  Cool on rack until room temperature and then put in refrigerator overnight.  ( or until well chilled and completely set ) 

4.  Spread with whipped topping and garnish as desired.  Serve cold.  Keep leftovers in refrigerator.  

---------------------------------

Boy, this pie really was good.  If you aren't a fan of coffee, don't worry, you can't really taste it.  It just enhances the chocolate flavor..but you could just leave it out if you wish.  If you really like coffee, add a bit more for a nice "mocha" flavor.  The chocolate layer really does stay so nice and creamy and because the milk is already sweetened, there is no need for any additional sugar. 

While I loved the lemon version of this pie...what can I say?  Sometimes a girl just NEEDS chocolate!  

I will be honest with you, I tried to make an orange version of this pie with a ginger cookie crust....EPIC FAIL!  lol  I was glad the chocolate version turned out so well.  :) 


This recipe is being shared with:

Looking for more pie recipes?  Check out these:

Wednesday, April 18, 2012

Meatless Philly Cheesesteaks (w/Seitan)


Seitan....have you ever heard of it?

Seitan....pronounced "say-tan", as I have found out, is flavored wheat gluten that is used to replace meat.  (So evil sounding!)  I am not, nor ever have been a vegan, but I like to experiment with meatless meals for my family now and then, and when I saw this recipe using seitan on none other than good old Dr. Oz, I was intrigued.  First off...could I find this seitan product at my local grocery (and would it be reasonably priced) and second, could I foul my picky, picky husband into eating a meatless meal....hmmmmmm?

Philly Cheesesteak is one of those notoriously high fat and calorie sandwiches I have all but taken entirely out of my diet.  A chance to bring this "fun" food back into my life without feeling guilty about it certainly had it's charm.  

I was surprised to find the seitan strips very easily in my local grocery.  They were located by the tofu and other vegan products.  They were a tad pricey, but not more than I would have spent on meat for the purpose of making this dish...so I decided to take the plunge.


Turning the box over this is what I saw:


And the nutritional stats were pretty good too!


The biggest lure to this product was the fact that it was void of saturated fat and had some fiber.  The downside would be if you are sensitive to wheat and wheat gluten.

But could it be a reasonable replacement to beef and chicken as the box claimed?

I opened the package and their was no odd smell.  ( I was prepared...ever made shiritaki noodles?  ew!  lol) It was packed in liquid which I drained off and then placed  the seitan on a paper towel until I was ready to add it to the recipe.  


Although I had bought the "strips", I still found them to be kind of big, so I ran a knife through them to cut them up more before I added them to the pan.

The rest of the recipe is no surprise...the normal sort of stuff you would find in a Philly cheese steak...onion, peppers, mushrooms, garlic and seasonings....all sauteed up until soft...


Add in the seitan to heat it up...


And then cover it with cheese! ( I used reduced fat mozzarella, NOT the vegan cheese the original recipe called for)  So my meal wasn't vegan, but it was still meatless. 


Finally, spooning the mixture into a bun of your choice...


The Verdict:

Pretty darn good!  Good enough to foul the picky husband into NOT knowing it was meatless! The texture is really similar to meat and the taste isn't bad at all.  It's not flavorless like tofu...but it's not a bad taste either. I served these on Pepperidge Farms 100% whole wheat soft hoagie rolls.  (the rolls were 4p+ each) All boys gave this meal a thumbs up.  I served it with the BEST Oven Baked Fries for some extra fun.  I would make this again.

I think this same recipe would also be great using chicken, if you didn't want to go the meatless route.  But sometimes...it's good to try something new...because you just never know!


Meatless Philly Cheesesteaks ( w/Seitan ) 
adapted from The Dr. Oz Show


Servings - 4   Serving Size - 1/4th of mixture   Points Plus per serving - 4 points+
( Nutritional information for filling only, bun NOT included)  Calories - 187.3,   Total Fat - 6.5g,   Carb. - 9.5g,   Protein - 21.8g,   Fiber - 2.6g


1 med onion, sliced
1 med red pepper, sliced
1 med green pepper, sliced
8 oz. fresh mushrooms, sliced
2 cloves garlic, minced
1- 12oz. package of seitan, drained and chopped
1 tsp Worcestershire sauce
salt and pepper, to taste
1 cup reduced fat mozzarella

1.  Spray a large nonstick skillet generously with cooking spray.  Add in onion, peppers, garlic and mushrooms.  Saute on med/high heat until veggies are tender.  Add in the seitan, Worcestershire sauce and salt and pepper. Heat through.  

2.  Take off heat.  Top with 1 cup of cheese and mix in a bit.  Let the cheese melt.  

3. Spoon into buns of your choice.  Enjoy! 

--------------------------------------

Like I have mentioned, we really enjoyed this meatless meal.  If you want a true vegan sandwich, you will need to use vegan Worcestershire sauce and vegan cheese.  I did not.  For the 8p+ I spent on this sandwich, it was totally worth it!  

Have you ever had Seitan?  How have you used it if you have?  


This recipe is being shared with:
Full Plate Thursdays @ Miz Helen's Country Cottage


Tuesday, April 17, 2012

Lightened Up Salisbury Steak


For a very, very long time, I have been on the look out for a GREAT Salisbury Steak recipe.  I've tried many, but none ever came close to what I think Salisbury steak should taste like.  Salisbury steak is a bit of nostalgia from my childhood, and well, don't laugh, but what I think it should mimic is the Salisbury Steaks from tv dinners.  There...hahah...I said it.  My mom was a single working mother and the truth is, as kids we ate a lot of tv dinners...you know the ones, in the divided up metal trays.  ( I am probably dating myself here, because obviously the metal trays were used during the pre-microwave years when we had to heat everything in the oven!) 

Today, I rarely succumb to processed foods.  But you can't take away those childhood memories that give us comfort..and yes, Salisbury steak dinners in the tv trays really is just that for me.  Although I will venture to guess, that the tv dinners of yesteryears probably weren't all that bad for you...they tended to rely on real ingredients unlike so many processed foods today. 

When I saw a recipe for Salisbury Steaks on My Bizzy Kitchen last week, and I saw that Biz raved about it, I knew I had to give it a try.  Her pictures made my mouth water! I was hoping I wouldn't be disappointed by yet another recipe that produced a glorified hamburger with gravy on top that was tough.  What I was looking for was a super tender beef patty with the distinct flavor I remembered from my childhood.  And guess what?  THIS IS THE RECIPE THAT DOES THAT!! 

I did adjust her recipe just a tad.  I used bread moistened with milk for the binder, added in shallots and left out the dijon mustard ( I actually just forgot to add it)...but I was really happy with the end result.   I also added finely chopped mushrooms to the meat to help keep it moist, tender and bring down the fat and calories of the final product.  The prepared horseradish sauce I used was Woeber's Reserve Smoky Horseradish Sauce.  I decided to use a ground sirloin with 10% fat as well.  I did this because I was bulking it up with the mushrooms anyway and the little extra fat helped keep the patties moist. 

While Biz made a gravy from a packet, I used Campell's Mushroom Gravy in a can.  1/4 cup serving is 1 point+. 


Don't forget to make a little divot in the center of the shaped patty to help keep it from puffing up while cooking.


This recipe is a keeper, especially if you were ever a fan of those Swanson TV dinners of the 70's!  The only thing this meal was missing was a little mini dessert!  lol


Lightened Up Salisbury Steak
adapted from MyBizzyKitchen


Servings - 6   Serving Size - 1 patty w/ 1/4 cup gravy   Points Plus per Serving - 4 Points+ for patty plus 1 Points+ for gravy
Nutrition Information for patty:   Calories - 174.1,   Total Fat - 8.7g,   Carb. - 4.5g,   Protein - 18.5g,   Fiber - 0.4g


1 pound ground sirloin ( 90/10)
8 oz. fresh sliced mushrooms, divided ( I buy them pre sliced cuz I'm lazy like that!)
2 slices of white bread ( I used Wonder Smart White)
1/4 cup skim milk
1 TBS dried shallots
1 egg, slightly beaten
1 tsp prepared horseradish sauce
1 tsp Worcestershire sauce
dash garlic powder
salt and pepper, as you like
2 cans of Campbell's Mushroom Gravy

1.  In a food processor, take 4 oz. of the mushrooms and finely chop.  Set aside.  Set aside the other 4 oz. of sliced mushrooms for the gravy.  

2.  In a large bowl, tear up the white bread slices ( you can leave the crust on ) into small pieces.  Add in the dried shallots and pour the milk over all.  Allow to sit for about 5 minutes or until the bread has absorbed most of the milk.  With a fork, mush the wet bread to form a paste.  

3.  Add in the ground sirloin, egg, horseradish sauce, garlic powder, salt and pepper and reserved finely chopped mushrooms.  Mix together.  Form into 6 patties, leaving a little indent in the center to prevent puffing when cooking.  

4.  Heat a large nonstick skillet that has been generously sprayed with cooking spray on high heat.  When hot, add in patties, but don't overcrowd the pan.  ( I cooked three at a time in two batches)  You want a nice brown crust on the outside.  Cook patties without disturbing them on one side, until the bottoms have a nice brown crust.  Flip and continue cooking all the way through.  ( Keep patties from first batch in warm oven while second batch is cooking)  

5.  In a med saucepan, saute the remaining sliced mushrooms over med heat with cooking spray.  When soft, add in the cans of gravy and heat through.  

6. Serve patties with gravy.  Mashed potatoes and peas make a great accompaniment!  

----------------------------------------

It's really funny how certain foods just bring back so many memories from our past...especially those from our childhood.  My whole family really enjoyed these Salisbury Steaks and you just can't beat the stats for home cooked beef comfort meal!  

The patties were super tender and had a nice flavor to them.  I will definitely be making this dinner for us again! 

How about you?  Do you have any foods or meals from your childhood that just scream comfort?  


>